 Power Viewer
User Guide
v1.4(August 28, 2026) · App version: 3.2.0+
0. Introduction
Power Viewer is a Windows desktop application for viewing and managing pharmaceutical marketing-authorization documents (eCTD: electronic Common Technical Document). It supports eCTD v3.2.2 / v4.0 and multiple regulatory authorities (PMDA, FDA, EMA, and others).
This guide explains operations task by task, for everyone from first-time eCTD readers to administrators who deploy and operate the application across an organization. The first thing to read is Chapter 1 (Quick Start).
0.1 Badge legend
The badges shown next to each section heading indicate the permissions and conditions required to use that feature.
- 📖 Features available with the Viewer role (viewing-focused)
- ⚙️ Features available with the Administrator role (database management and configuration)
- 💎 Features that require a license key (paid features such as album database integration)
Power Viewer offers two usage models: free use that requires no license key, and organization-oriented use that requires a license key (LicenseKey login). Team operation and access-rights management using an album database are available only in the latter (💎). See 8.1 for details.
1. Quick Start 📖💎
This walks a member of an organization that already has a license key through the shortest path: “install → log in → open and view an eCTD.”
1.1 Install and launch
Purpose: Get Power Viewer into a usable state
Steps:
- Run the installer and follow the wizard
- After installation completes, launch Power Viewer

Verify: The application launches and the login screen (or initial setup screen) is displayed
For details on the installation methods (PerMachine / PerUser), uninstallation, and upgrading, see the Installation guide.
1.2 Log in
Purpose: Log in to Power Viewer
Prerequisites: Receive the path to the group policy file from your administrator
Steps:
- Launch Power Viewer
- On the initial setup screen, enter the path to the group policy file you received (once set, this is not needed on subsequent launches)
- If multiple album databases are registered in the group policy, select the connection target from the list on the login screen (7.1)
- Enter the required information, and log in
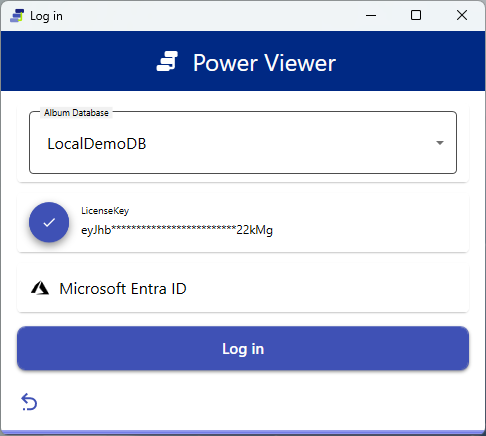
Verify: Login completes and the StartWindow (menu screen) is displayed
The login method is determined by your organization’s group policy. See 5.5 for the differences between methods. The connection-target list mixes local (SQLite) and cloud (Hosting) album databases (8.2). For individual use without a license key, you can switch to free-use login (Microsoft / Google / email OTP) from the initial setup screen. With free use, the album database and cloud storage integration are not available.
1.3 Open your first eCTD
Purpose: Open and view an eCTD folder on your machine
Steps:
- Open “Open eCTD – Local” from the left menu
- Select and add a Sequence Folder (a folder containing
submissionunit.xmlorindex.xml) - From the extracted list of Applications, choose the target Application and open it
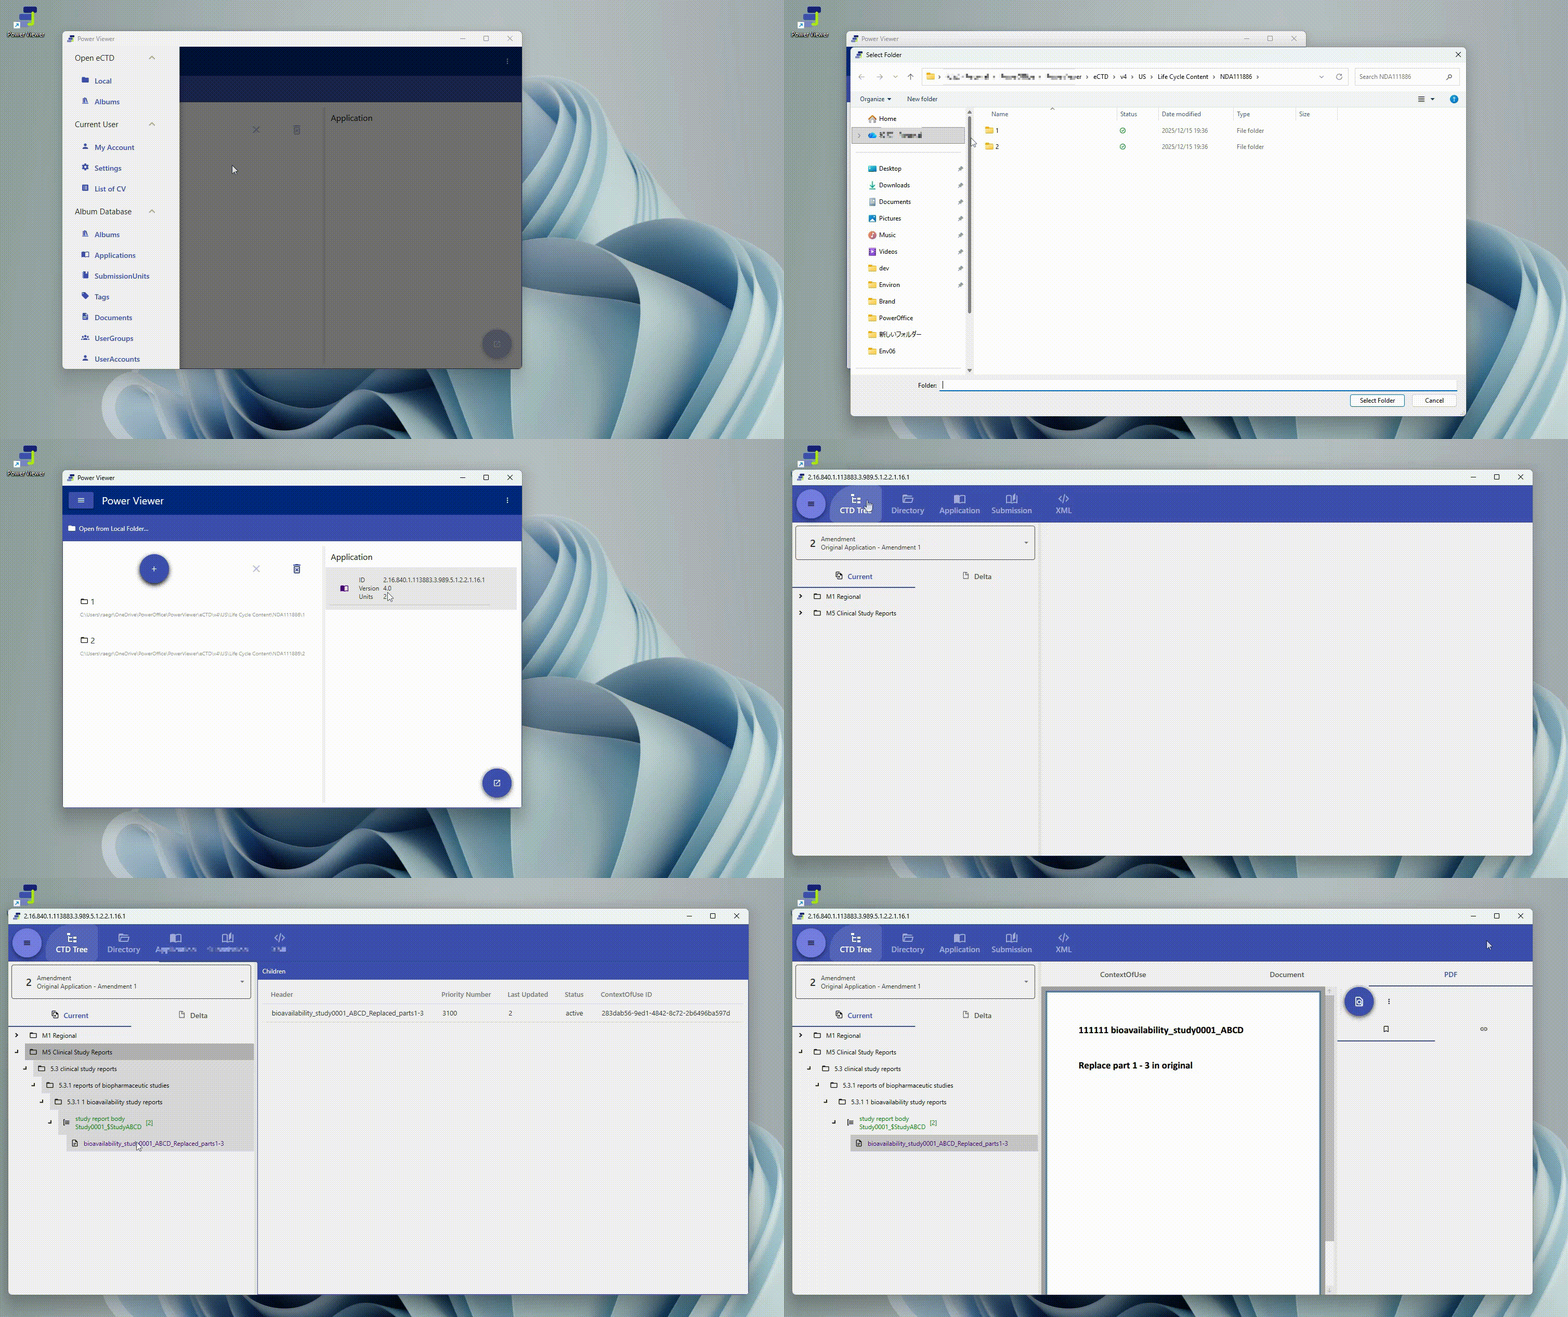
Verify: A viewing Window opens and the CTD Tree is displayed
2. Open an eCTD 📖
2.1 Open from a local folder
Purpose: Open a local eCTD visible in Explorer directly, without registering it in a database
Steps:
- Open “Open eCTD – Local”
- Add a Sequence Folder to the Left Pane (unneeded folders can be removed)
- In the Right Pane, select an extracted Application and click “Open”
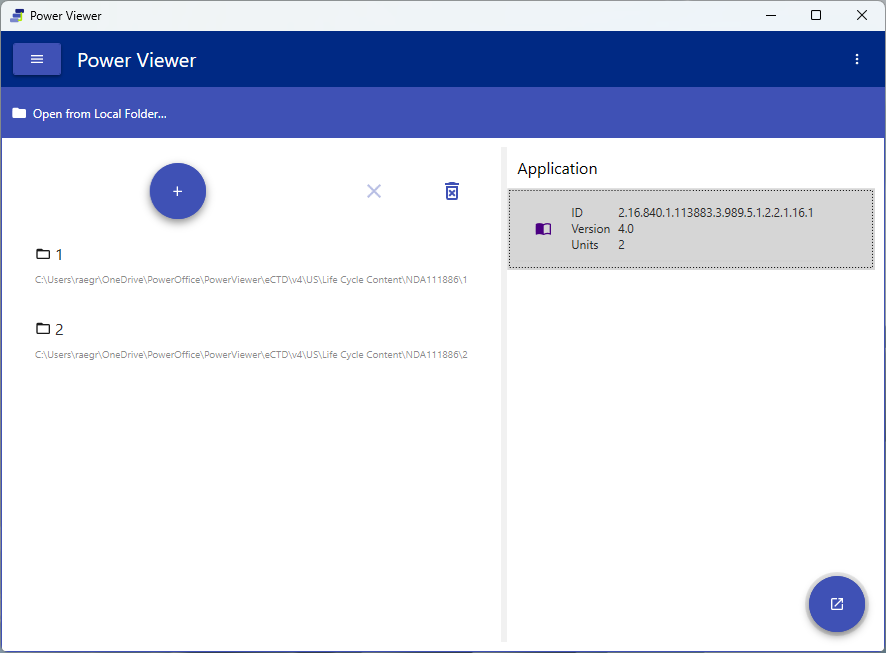
Verify: A viewing Window for the selected Application opens
Opening from a local folder is available even without a license key. The Application ID, version, regulatory authority, and specification are determined automatically from the contents of the eCTD.
2.2 Open from an album 💎
Purpose: Open an eCTD that is registered in your organization’s album database
Prerequisites: A valid license key and access rights to the album database
Steps:
- Open “Open eCTD – Album”
- Check the SubmissionUnits you want to view (uncheck any you want to exclude before loading)
- Run “Load” (cloud storage authentication may be requested as needed; results appear in Load Status)
- Once all targets have loaded successfully, click “Open eCTD”
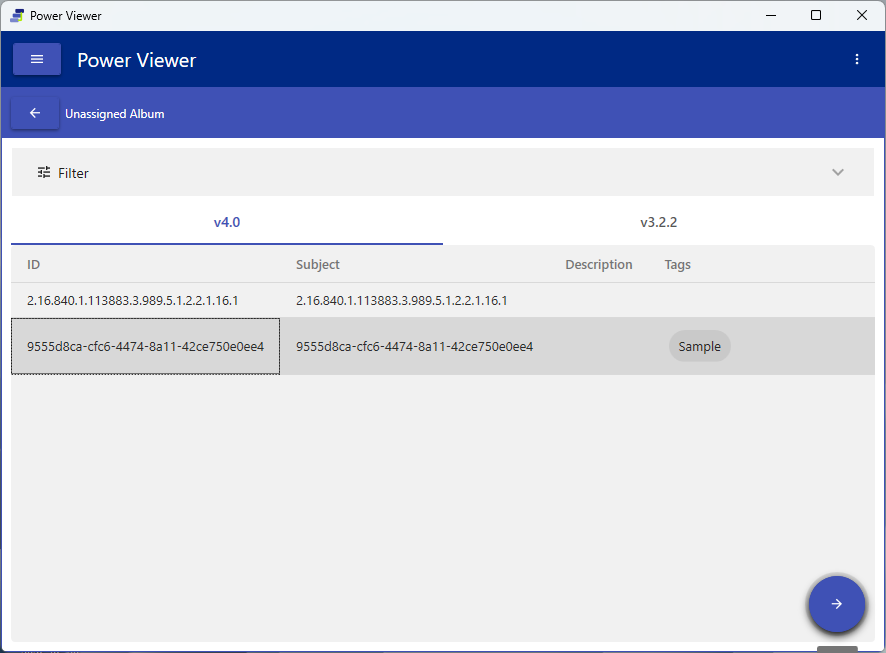
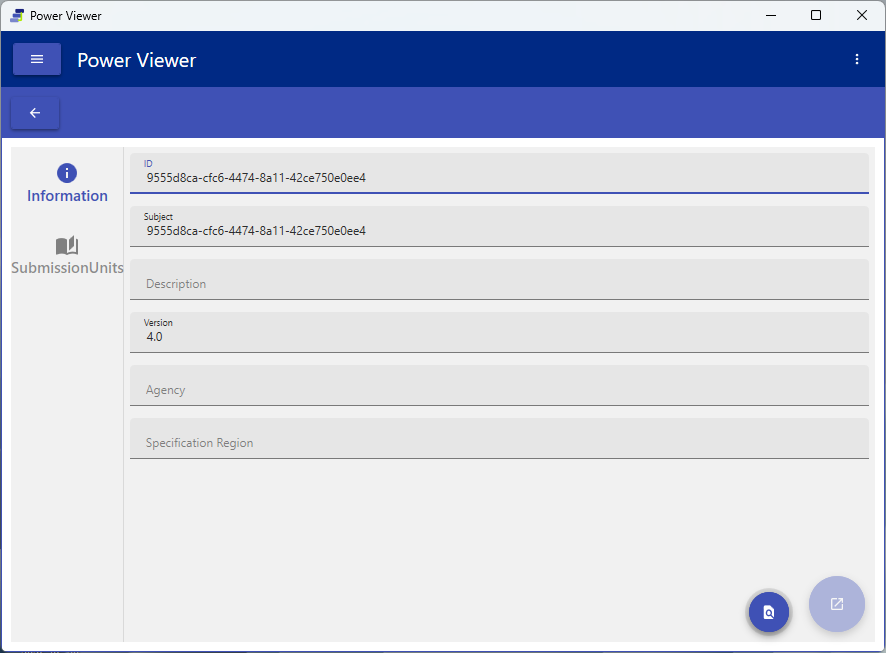
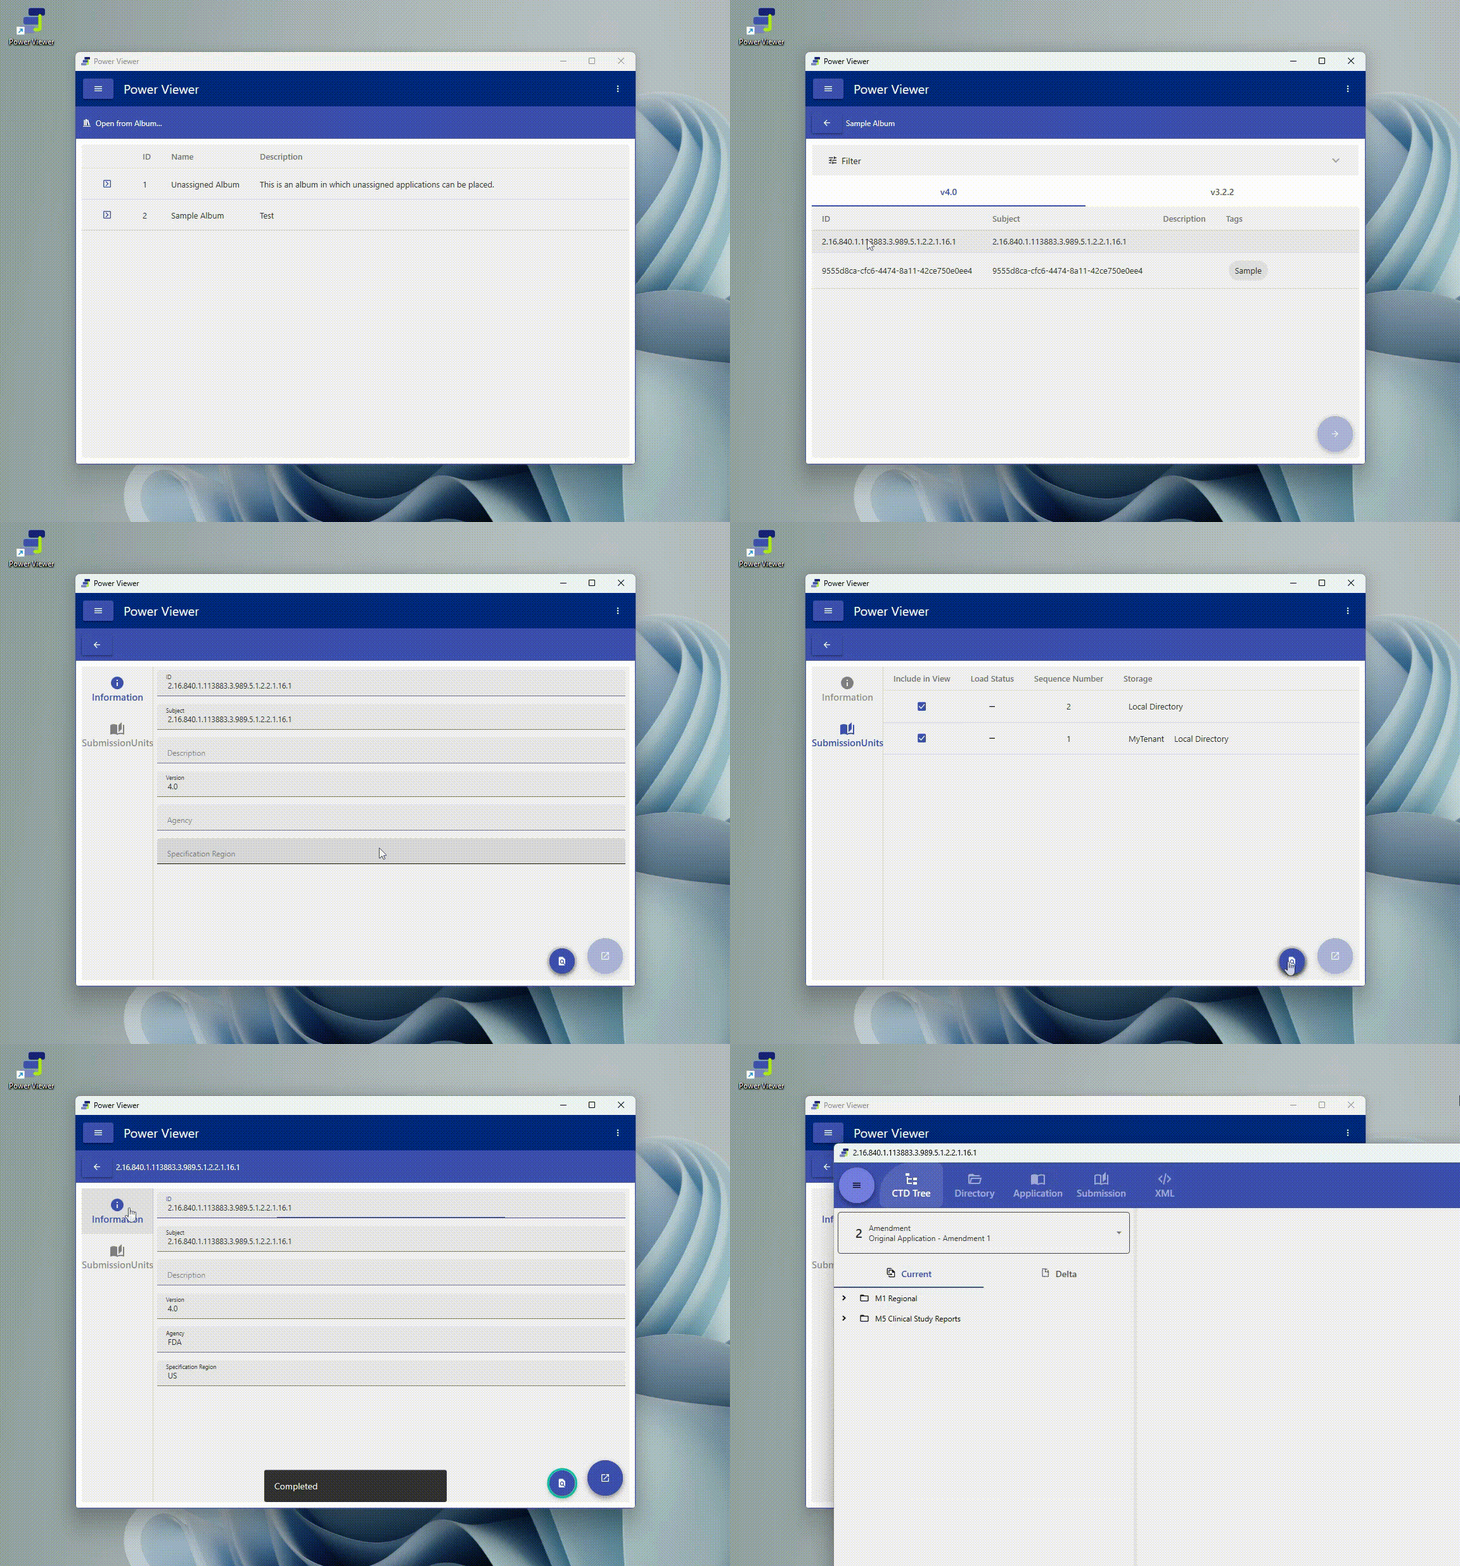
Verify: A viewing Window opens for the Applications that loaded successfully
A license key is required to use this feature. In addition, access rights (8.1) control which Applications / Documents you can view. The operation to open is the same whether the album database is local (SQLite) or cloud (Hosting) (8.2). For cloud storage authentication and configuration details, see the eCTD Storages guide.
3. View an eCTD 📖
3.1 Overview of the viewer screen
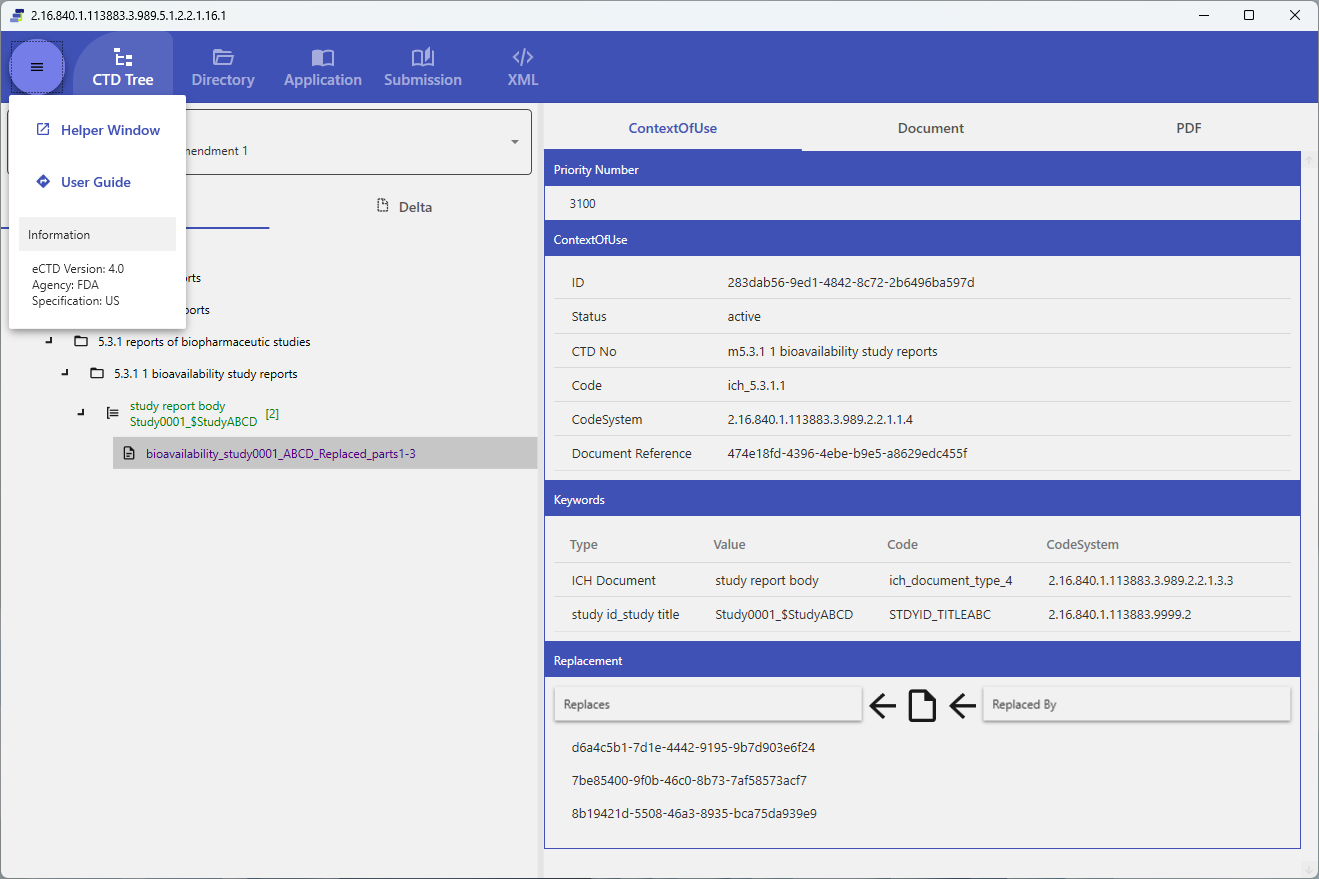
The viewing Window shows one Application at a time, switching between areas via the tabs at the top. From the menu button in the upper right, you can check the eCTD’s metadata (Version / Agency / Specification), open the Helper Window, and access a link to this user guide. The same menu also contains Export HTML (3.8).
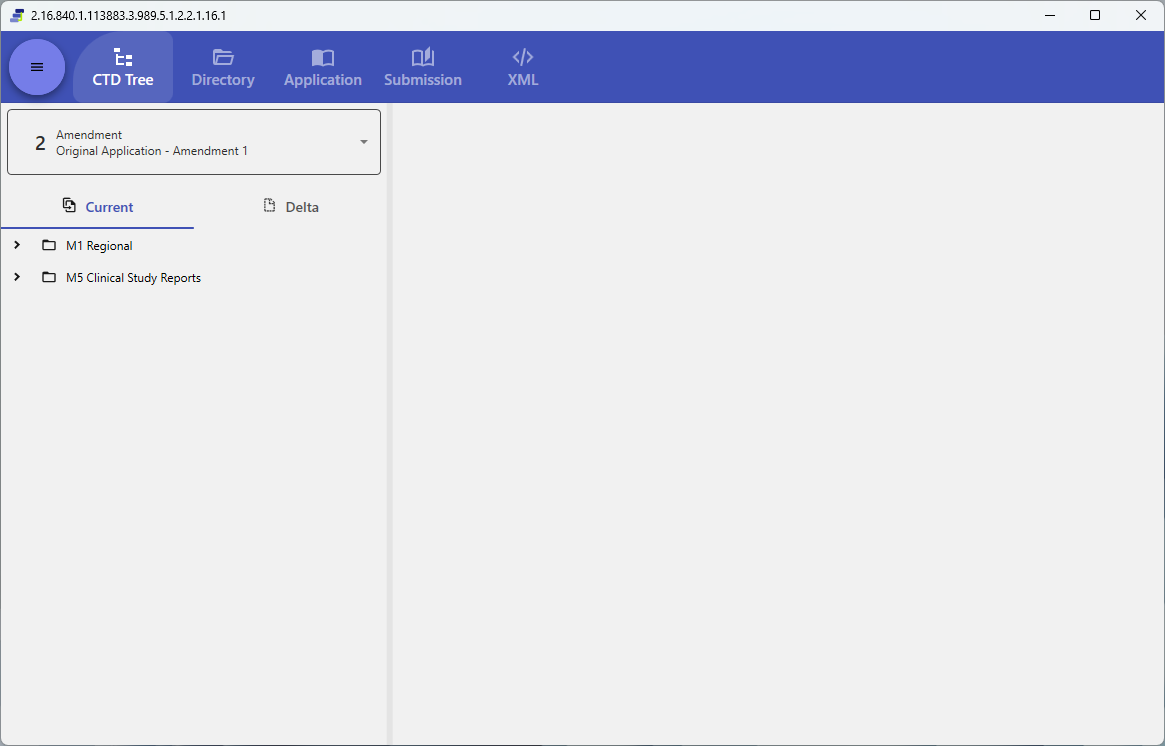
Main tabs (tab names are in English regardless of the language setting; the tab structure differs by eCTD version — see 3.7):
- CTD Tree: Browse submitted leaves in a tree structure (the main way to view)
- Directory: Show the directory structure of the actual files
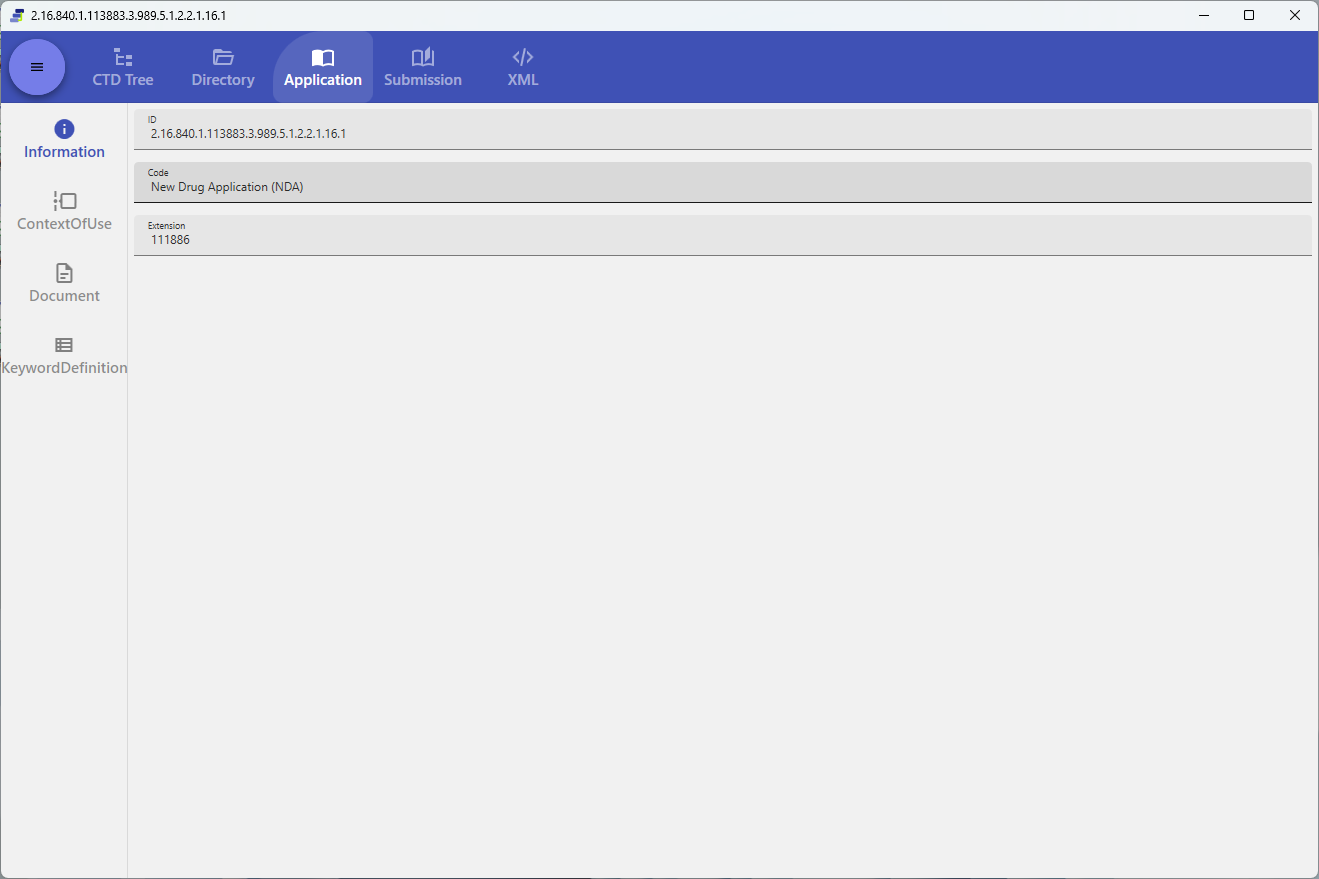
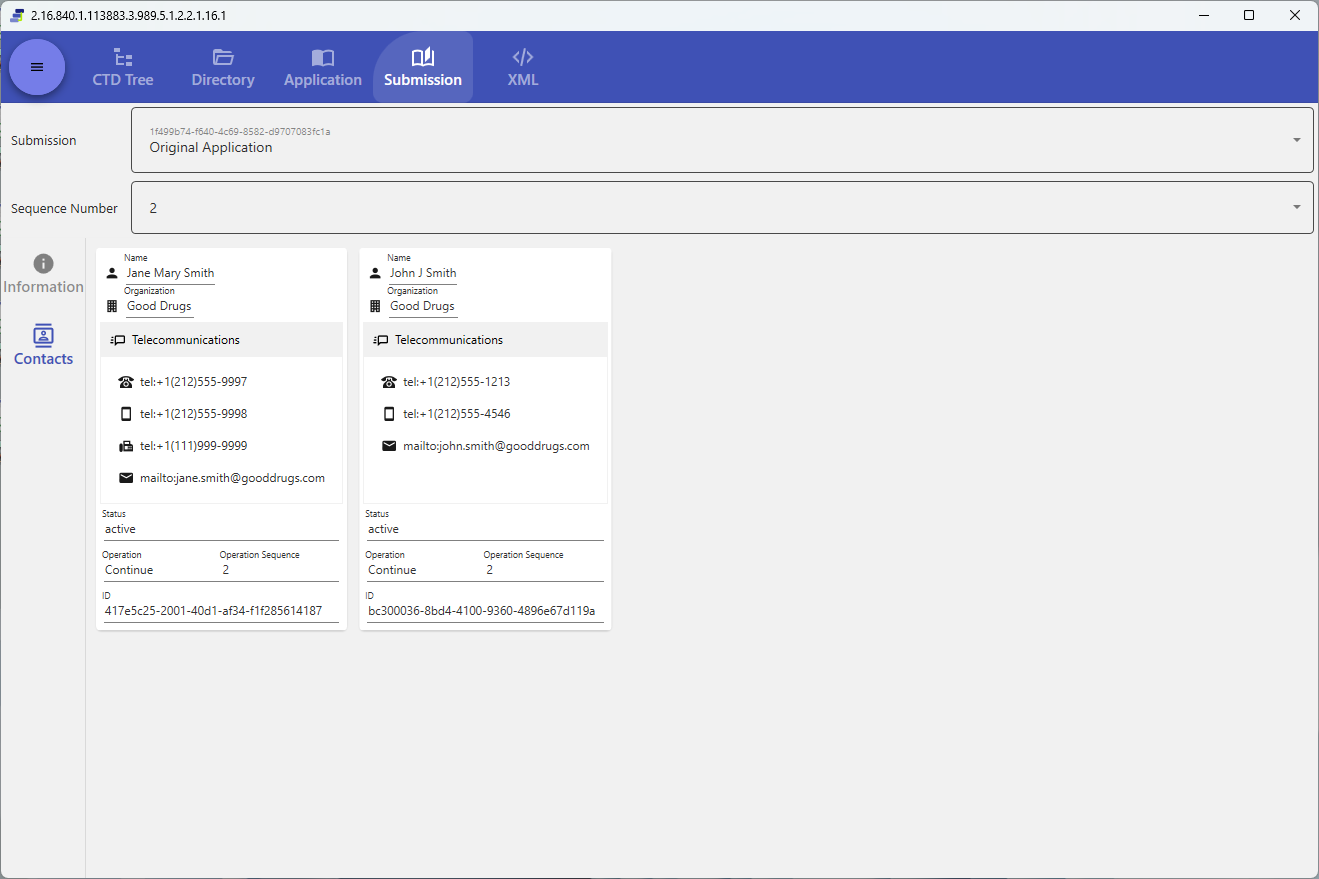
- Application / Submission: Show application/submission-unit information in table form (v4.0 only)
- XML: Show
submissionunit.xmlas-is - Styled: Show content formatted with an XSL stylesheet (v3.2.2 only)
- Datasets: Show dataset information (v4.0 JP only)
3.2 Read documents in the CTD tree
Purpose: Trace and view submitted leaves in a tree structure
Steps:
- Open the “CTD Tree” tab
- Select a section (leaf) from the tree on the left
- The content of the selected leaf (PDF / XML, etc.) is displayed on the right
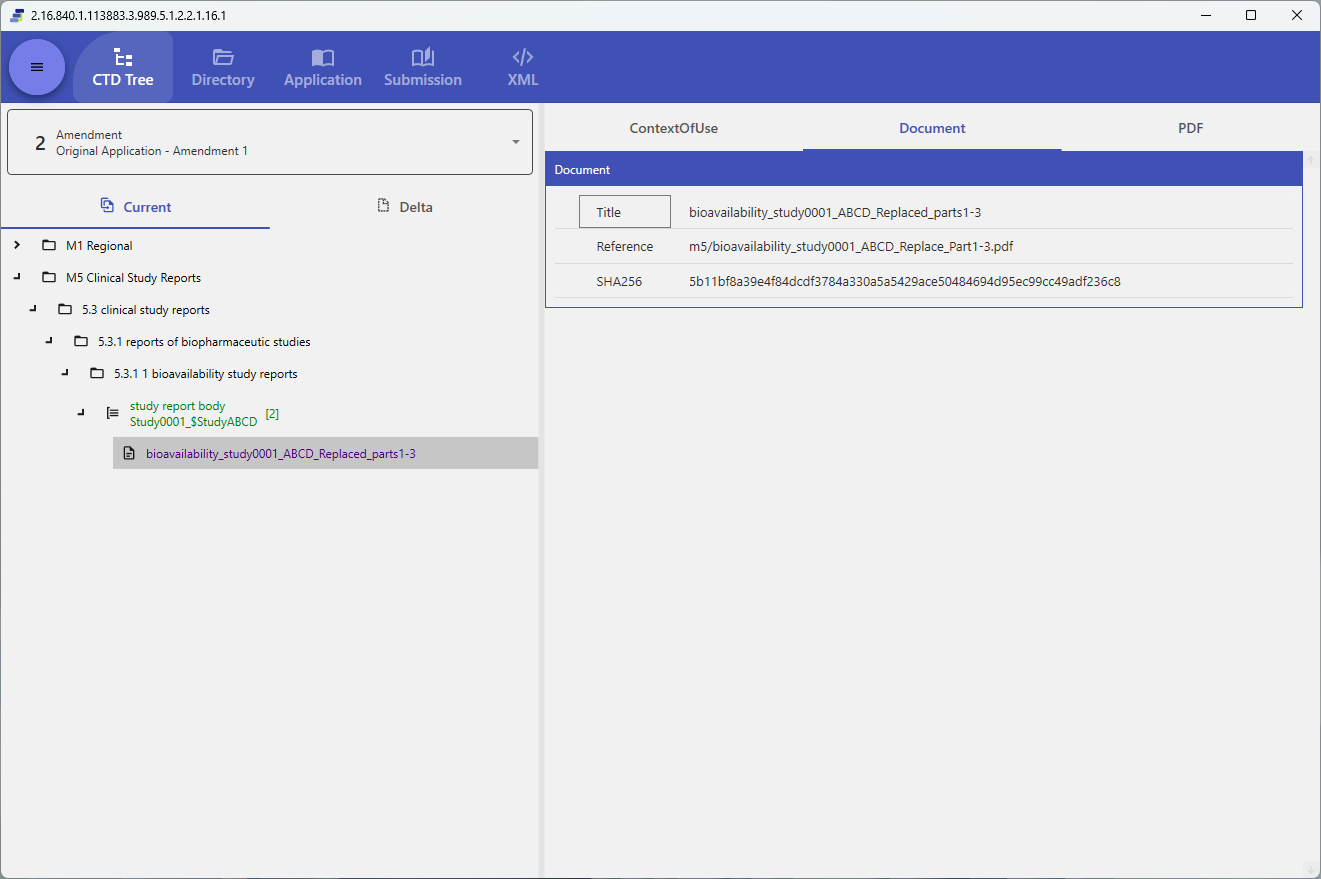
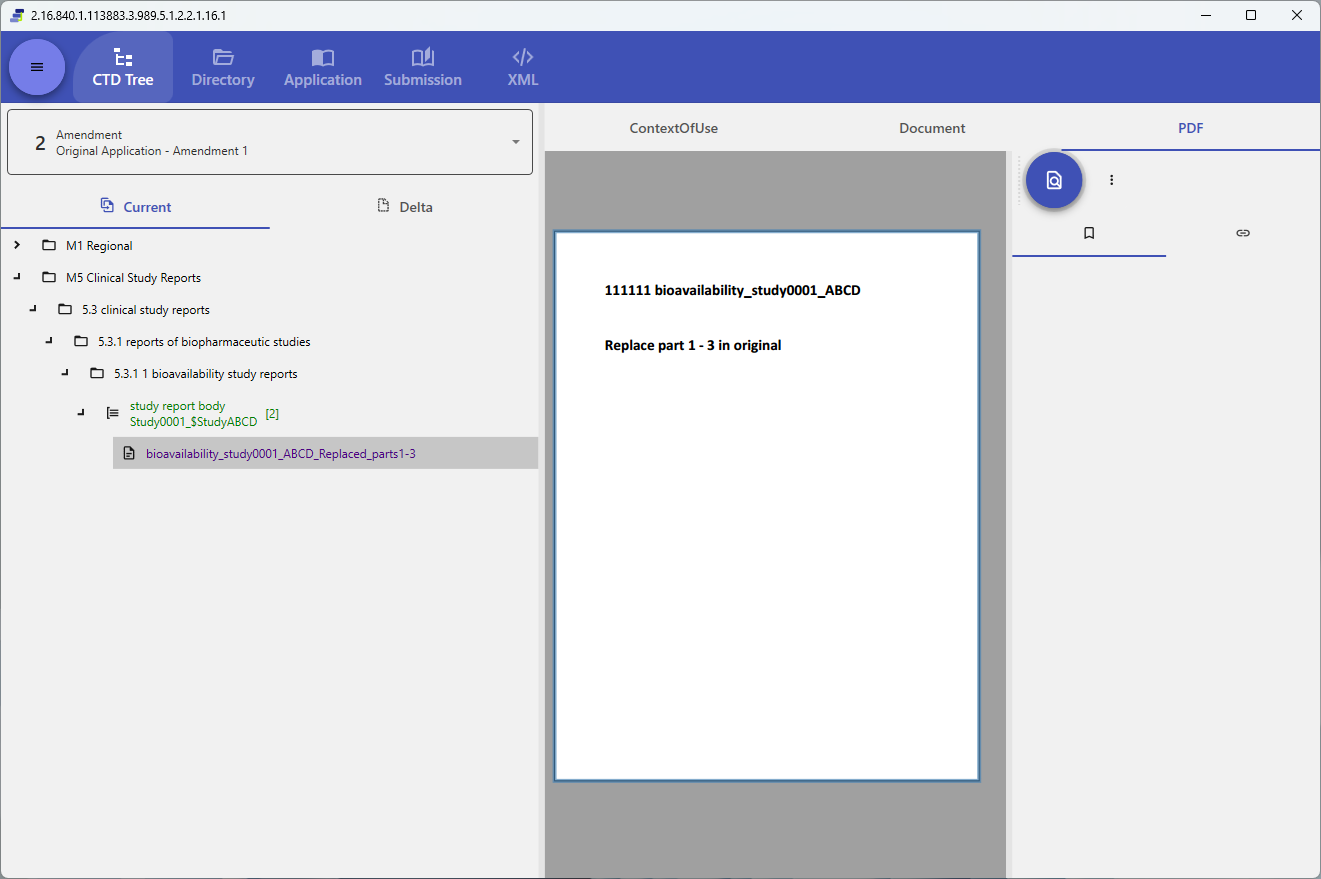
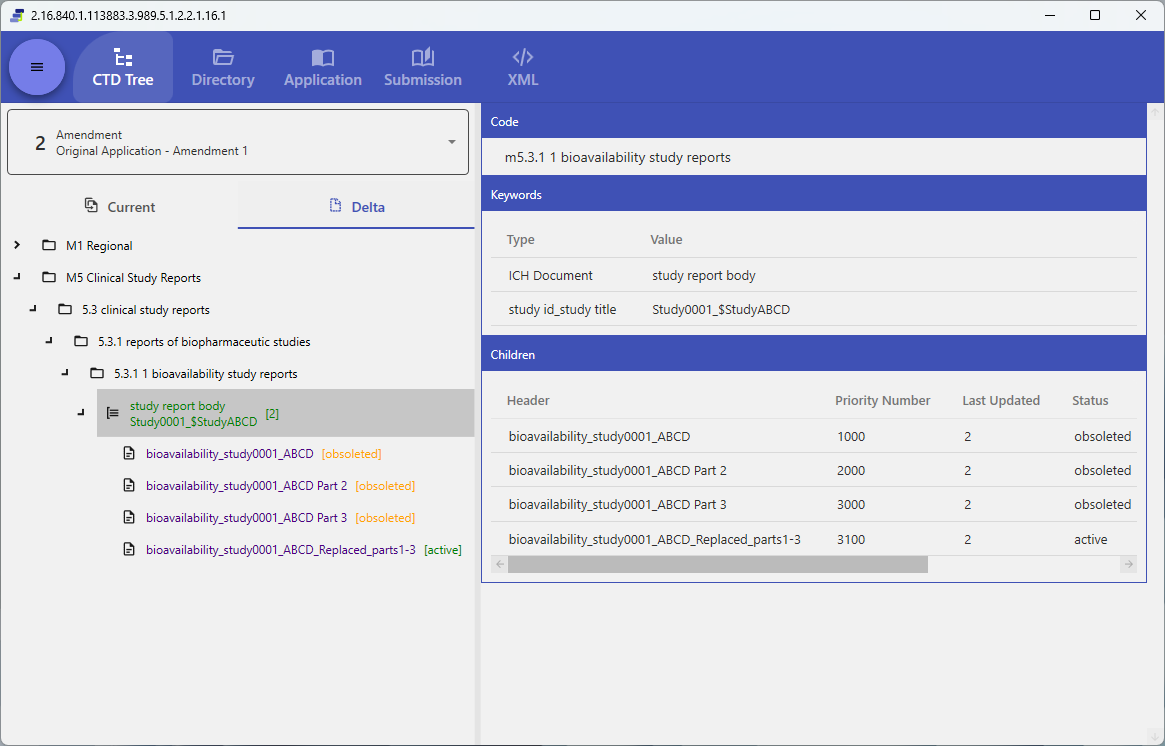
Tip: Depending on the standard and authority, additional information tabs such as differences between versions (Delta) and Context of Use are displayed.
The tree and directory ordering shows folders first, then a natural sort within each level (numbers compared as numbers). For example, sequence folders are ordered
1, 2, 10(not1, 10, 2) and modulesm1, m2, m10(both v3.2.2 and v4.0).
3.3 Follow links / Helper Window
Purpose: Check the destination of a link within a document
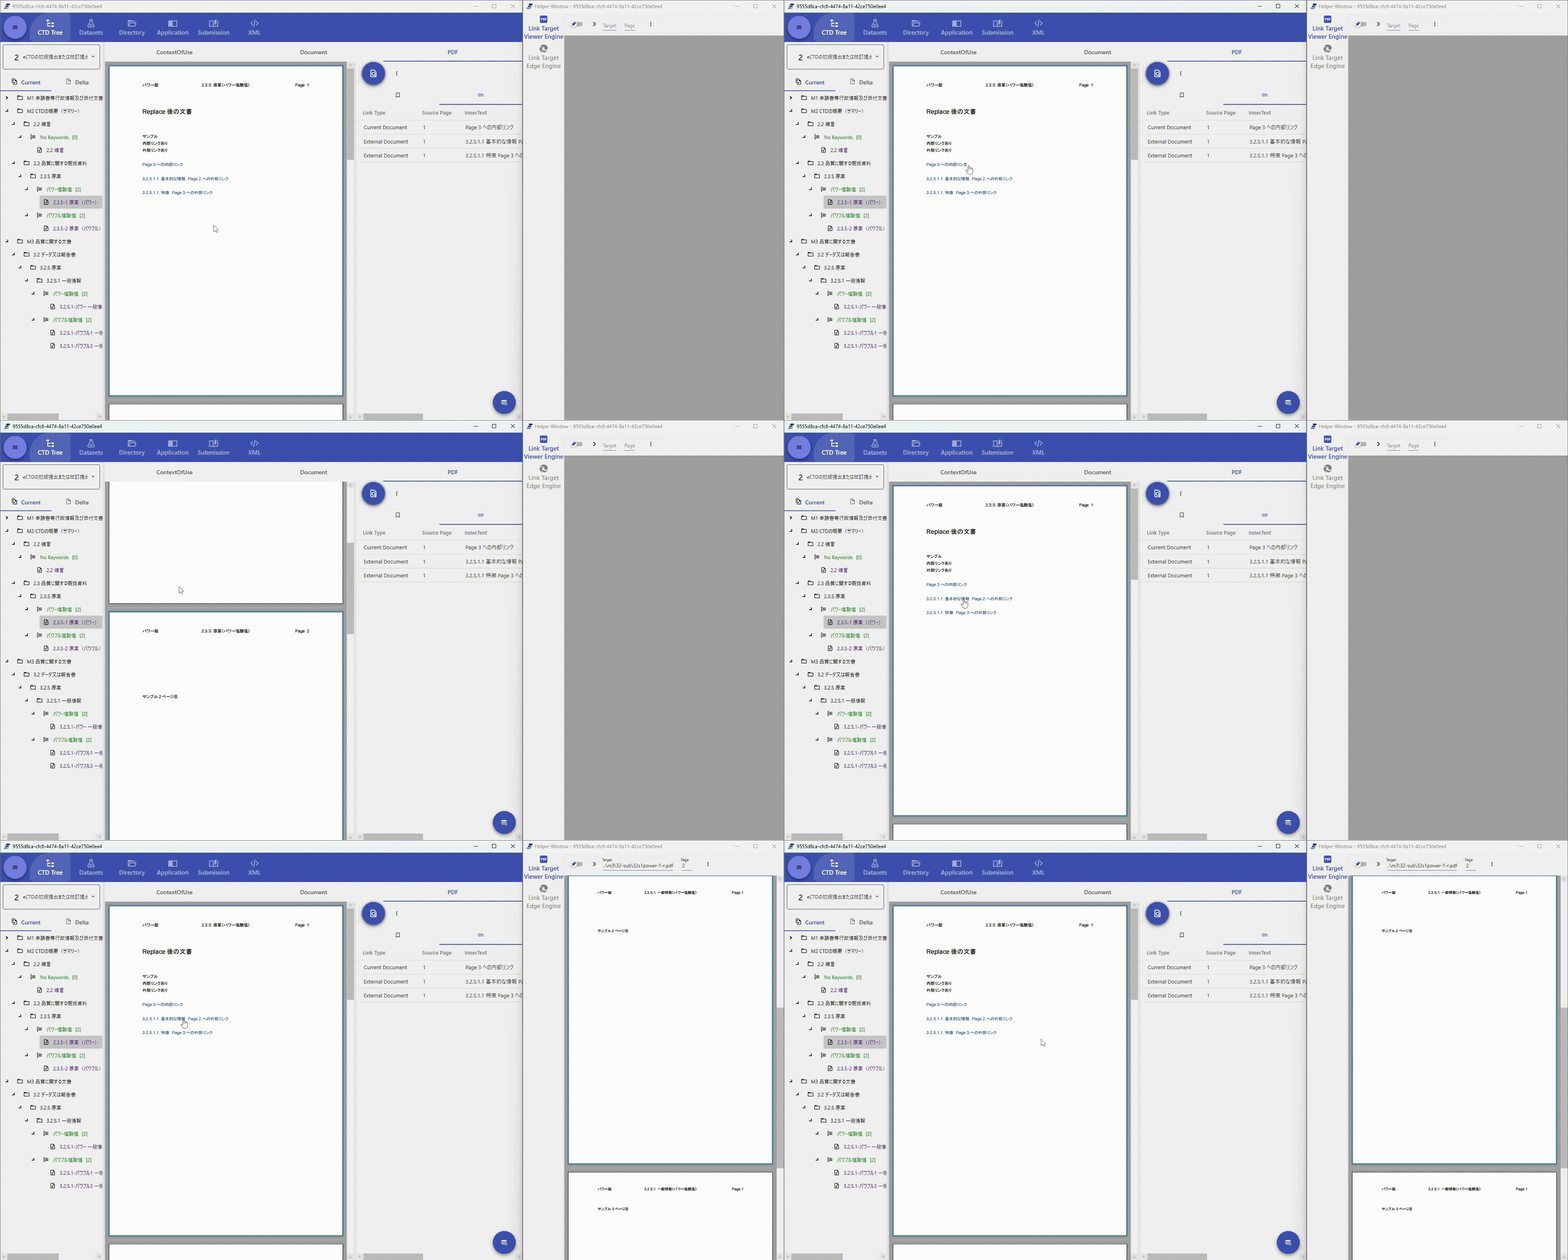
When you click a link inside a PDF, the link destination is shown in the Helper Window. You can place the body text (Main Window) and the link destination (Helper Window) side by side and read them while cross-referencing.
3.4 Directory view and file download
Purpose: Check the Directory structure and open folders/files in a browser or download them
Steps:
- Open the “Directory” tab
- Select a folder/file
- Open it in a browser, or download it
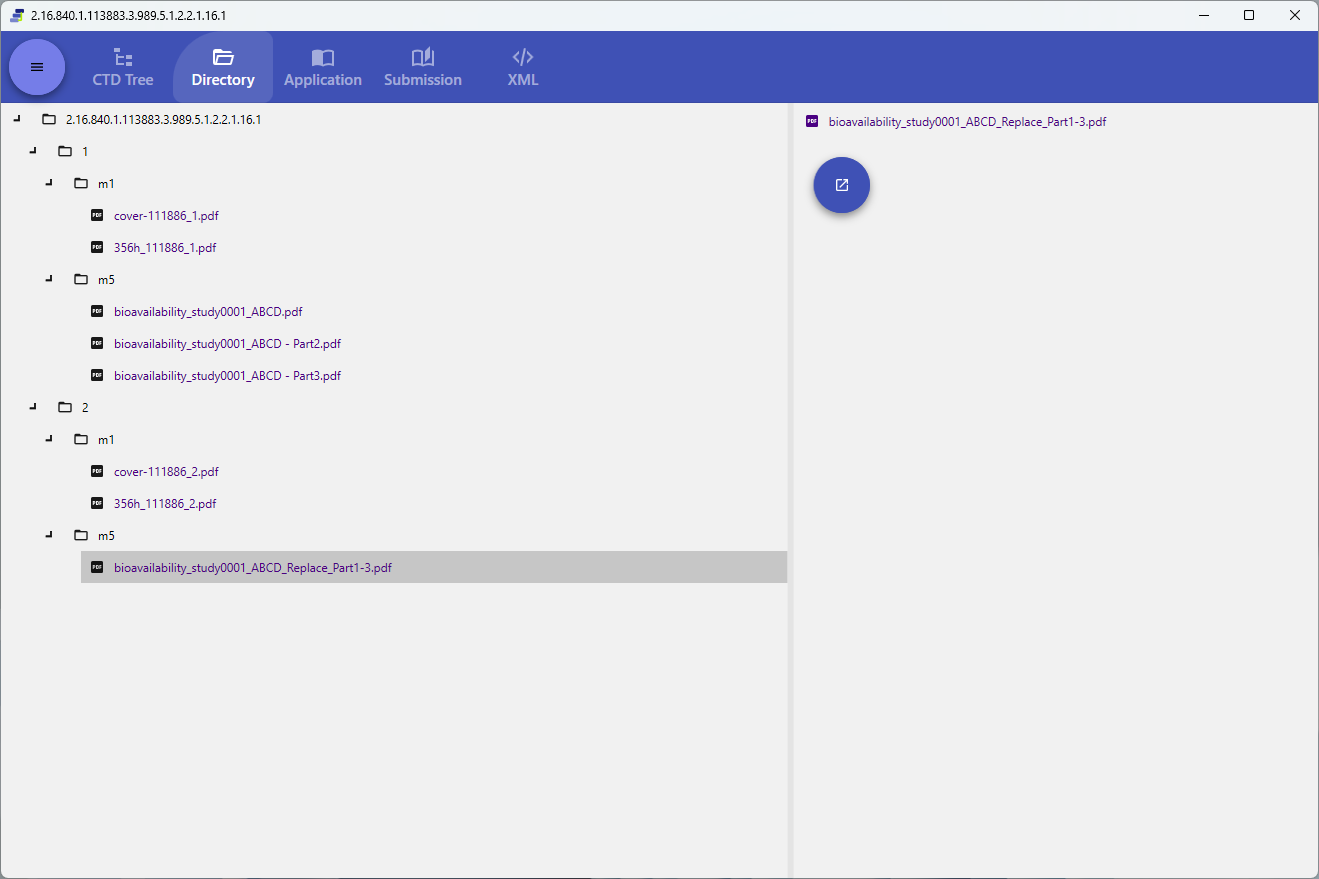
Depending on the type of eCTD Storage (where the data is stored), some operations (such as opening in a browser) may not be supported (6.4).
3.5 Other tabs (Application / Submission / XML / Datasets)
-
Application (v4.0 only): Shows application-unit information (Information / Document tables / Context of Use / keyword definitions, etc.) in table form. The displayed items differ by standard and authority.
-
Submission (v4.0 only): Shows submission-unit information (Information / Contacts, etc.).
-
XML: Shows
submissionunit.xmlas-is, without formatting.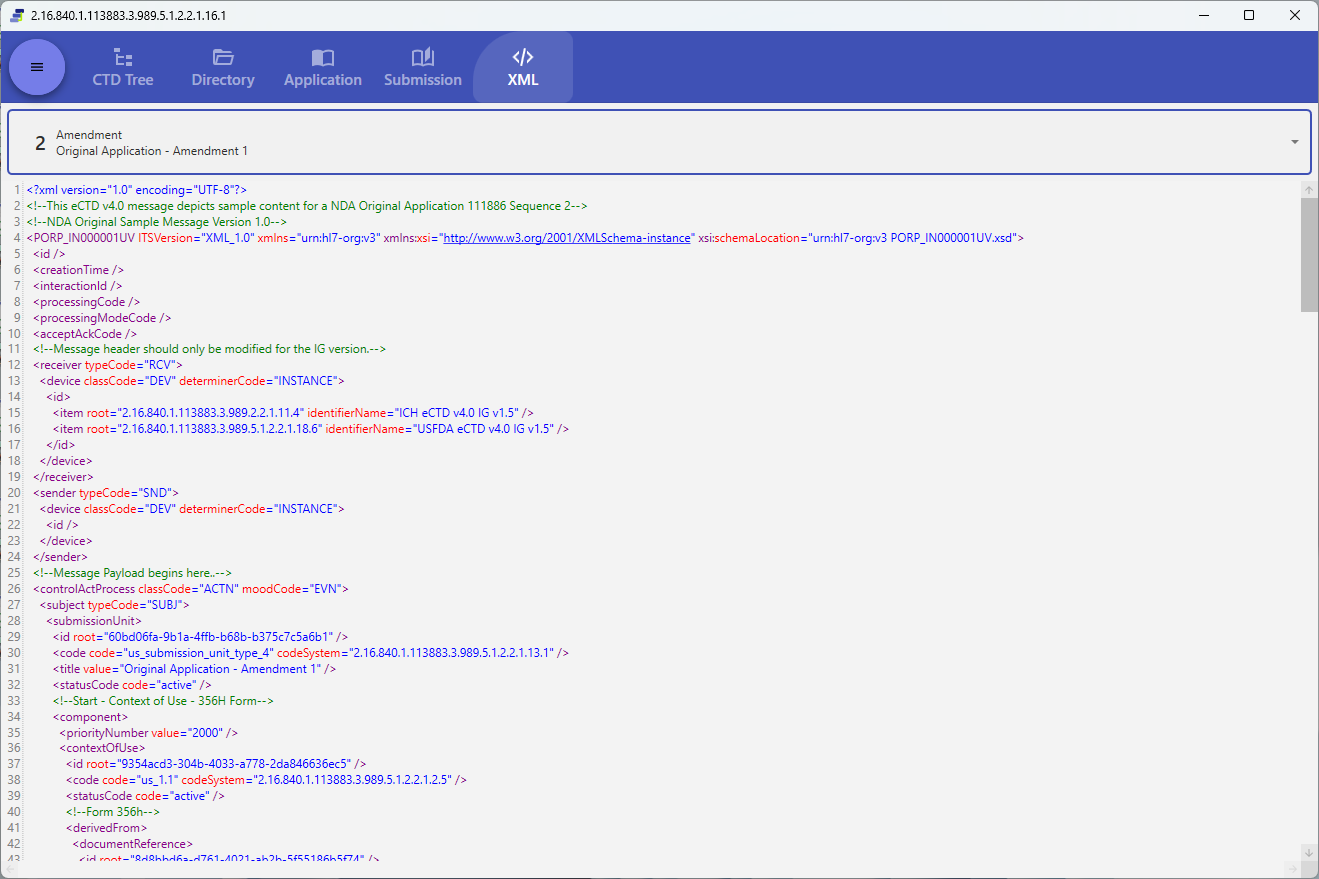
-
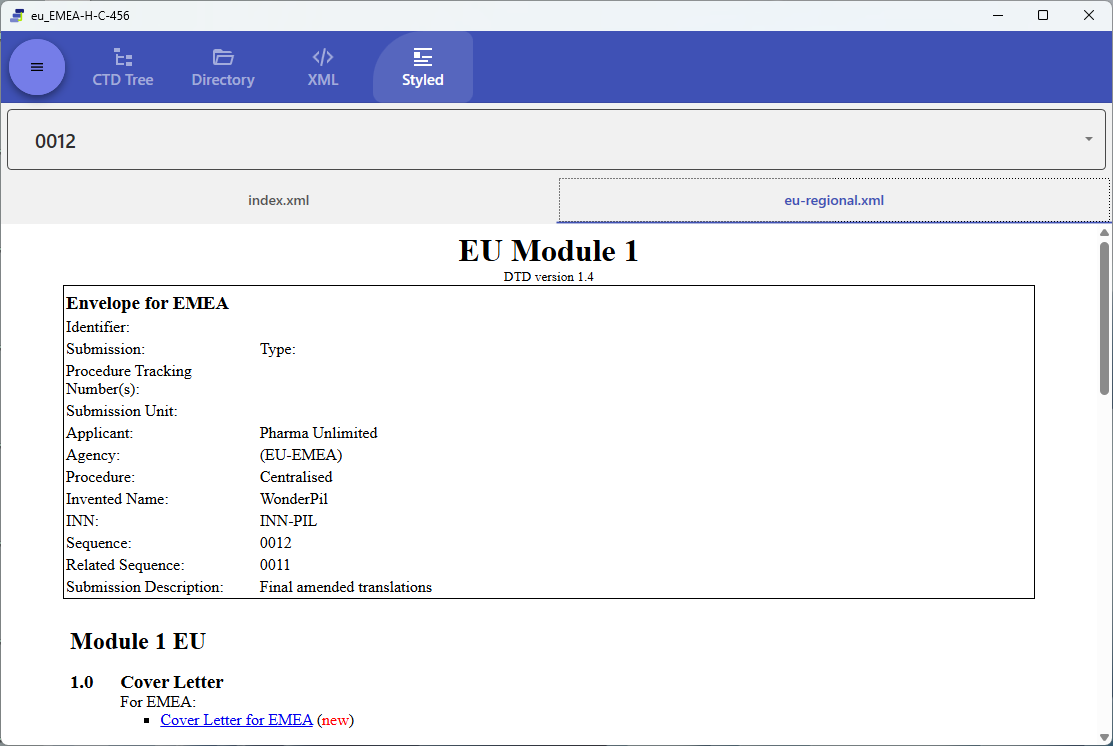
Styled (v3.2.2 only): An HTML view formatted with the authority-provided XSL stylesheet.
-
Datasets (v4.0 JP only): Shows the datasets (clinical and non-clinical study data) under
m5/datasetsas a per-study tree. This tab appears only when the opened Application is eCTD v4.0 with the JP (PMDA) specification; it is not shown for other versions or authorities. In album operation, dataset visibility can be controlled with Document Access Keys (M5ExceptedDatasets / STDM / ADaM; see 6.4).
3.6 Choosing the PDF viewer (Default and Edge)
Power Viewer lets you choose between two PDF rendering engines. Switch between them in Settings (4.2) according to your needs.
| Item | Default | Edge Engine |
|---|---|---|
| Internal links (within a document) | Supported | Supported |
| External links (links to other leaves) | Shown in Helper Window | Follows browser / internal handling |
| Text selection & rendering | Built-in engine | Chromium-based |
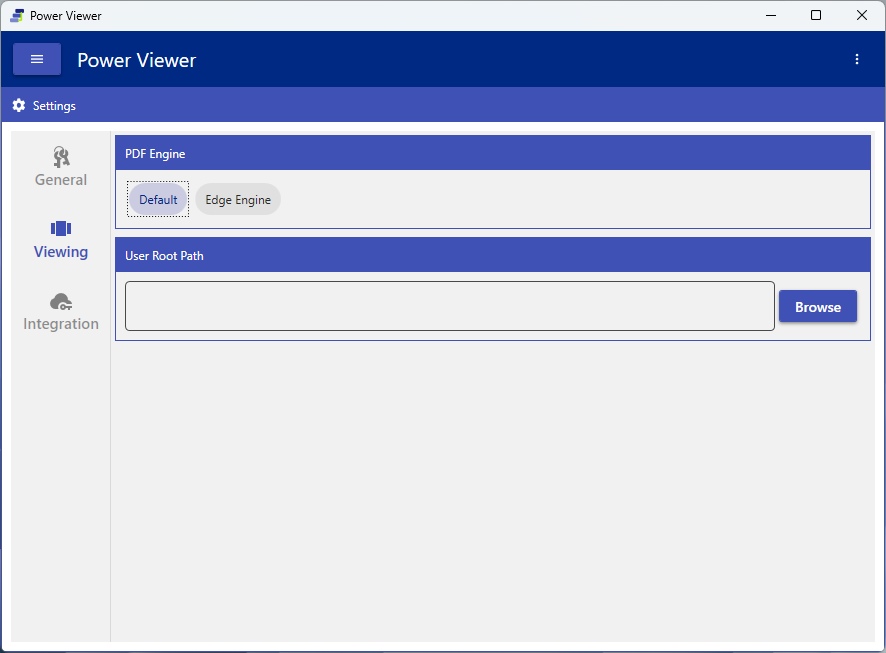
If the PDF viewer type is enforced by group policy, this setting item is not displayed (7.3).
3.7 Differences between v3.2.2 and v4.0
For common operations, see 3.1–3.6. Only the main differences are shown here.
- Tab structure: v4.0 consists of CTD Tree / Directory / Application / Submission / XML (JP additionally shows Datasets). v3.2.2 consists of CTD Tree / Directory / XML / Styled, with no Application / Submission / Datasets tabs; instead, the Styled tab provides a formatted view using the authority-provided stylesheet.
- Identifiers: v4.0 uses the UUID format, while v3.2.2 uses the traditional Application ID format.
- Authority support: v4.0 provides dedicated views for JP (PMDA) / US (FDA) / EU (EMA), and other authority specifications can be viewed with the generic (Other) view. v3.2.2 supports the specifications of 12 authorities — JP / US / EU / Switzerland / China / Canada / Australia / Singapore / Taiwan / Thailand / Korea / South Africa — plus Other. For per-authority details, see Supported versions and regions.
- HTML export: Available for both v4.0 and v3.2.2 (3.8). Only the structure of the output differs. v4.0 produces two pages per sequence (Current / Delta); v3.2.2 produces one page per sequence, with lifecycle operations shown as badges on the tree.
3.8 Export as HTML 📖 💎
Purpose: Turn an eCTD submission into a form that can be viewed in a browser by someone who does not have Power Viewer
Prerequisites:
- Available for both eCTD v4.0 and v3.2.2. Only the structure of the output differs (3.7, and What is exported below)
- 💎 is required. In the free usage mode (no license key) the button is disabled and the reason is shown in its tooltip
- The group policy option eCTD HTML Export may restrict it to administrators only (7.3). This setting is shared by v4.0 and v3.2.2
- You need document download permission (a Download type Document Access Key) for the Application you are viewing (6.4). This condition does not apply to an eCTD opened directly from a local folder (2.1)
Steps:
- Open a viewing Window and click the menu button in the upper right (the same menu as Helper Window / User Guide)
- Select Export HTML. A separate export window opens
- Review the displayed counts: the number of sequences, documents, access-restricted items, and unavailable items
- Choose the Destination folder with the Browse button
- Press Start. Progress is shown, and you can cancel partway through
- When it finishes, use Open Folder to check the destination

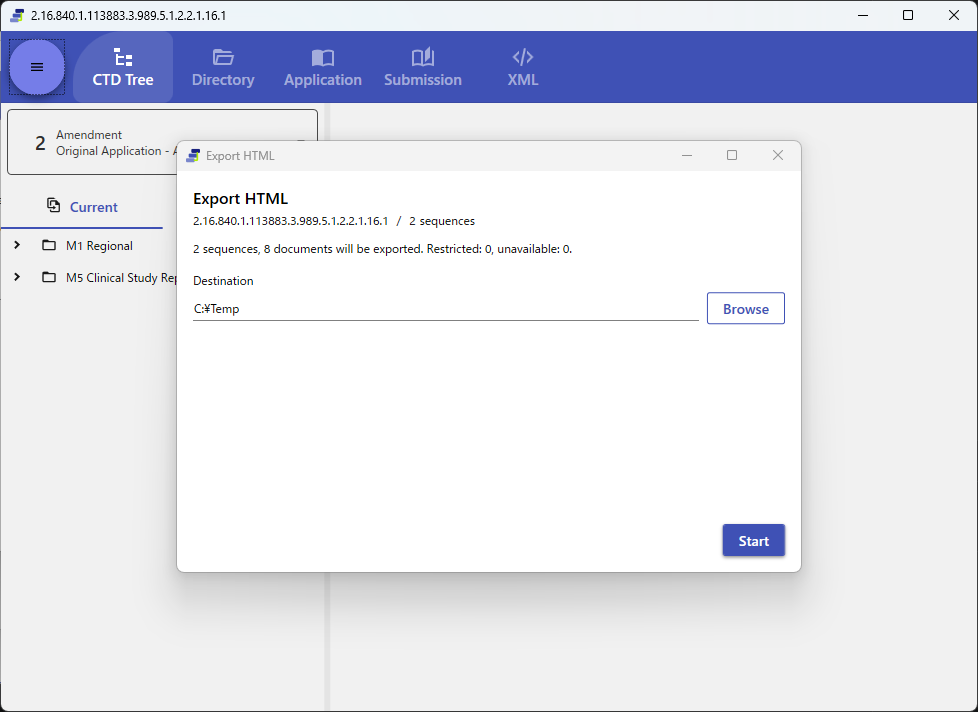
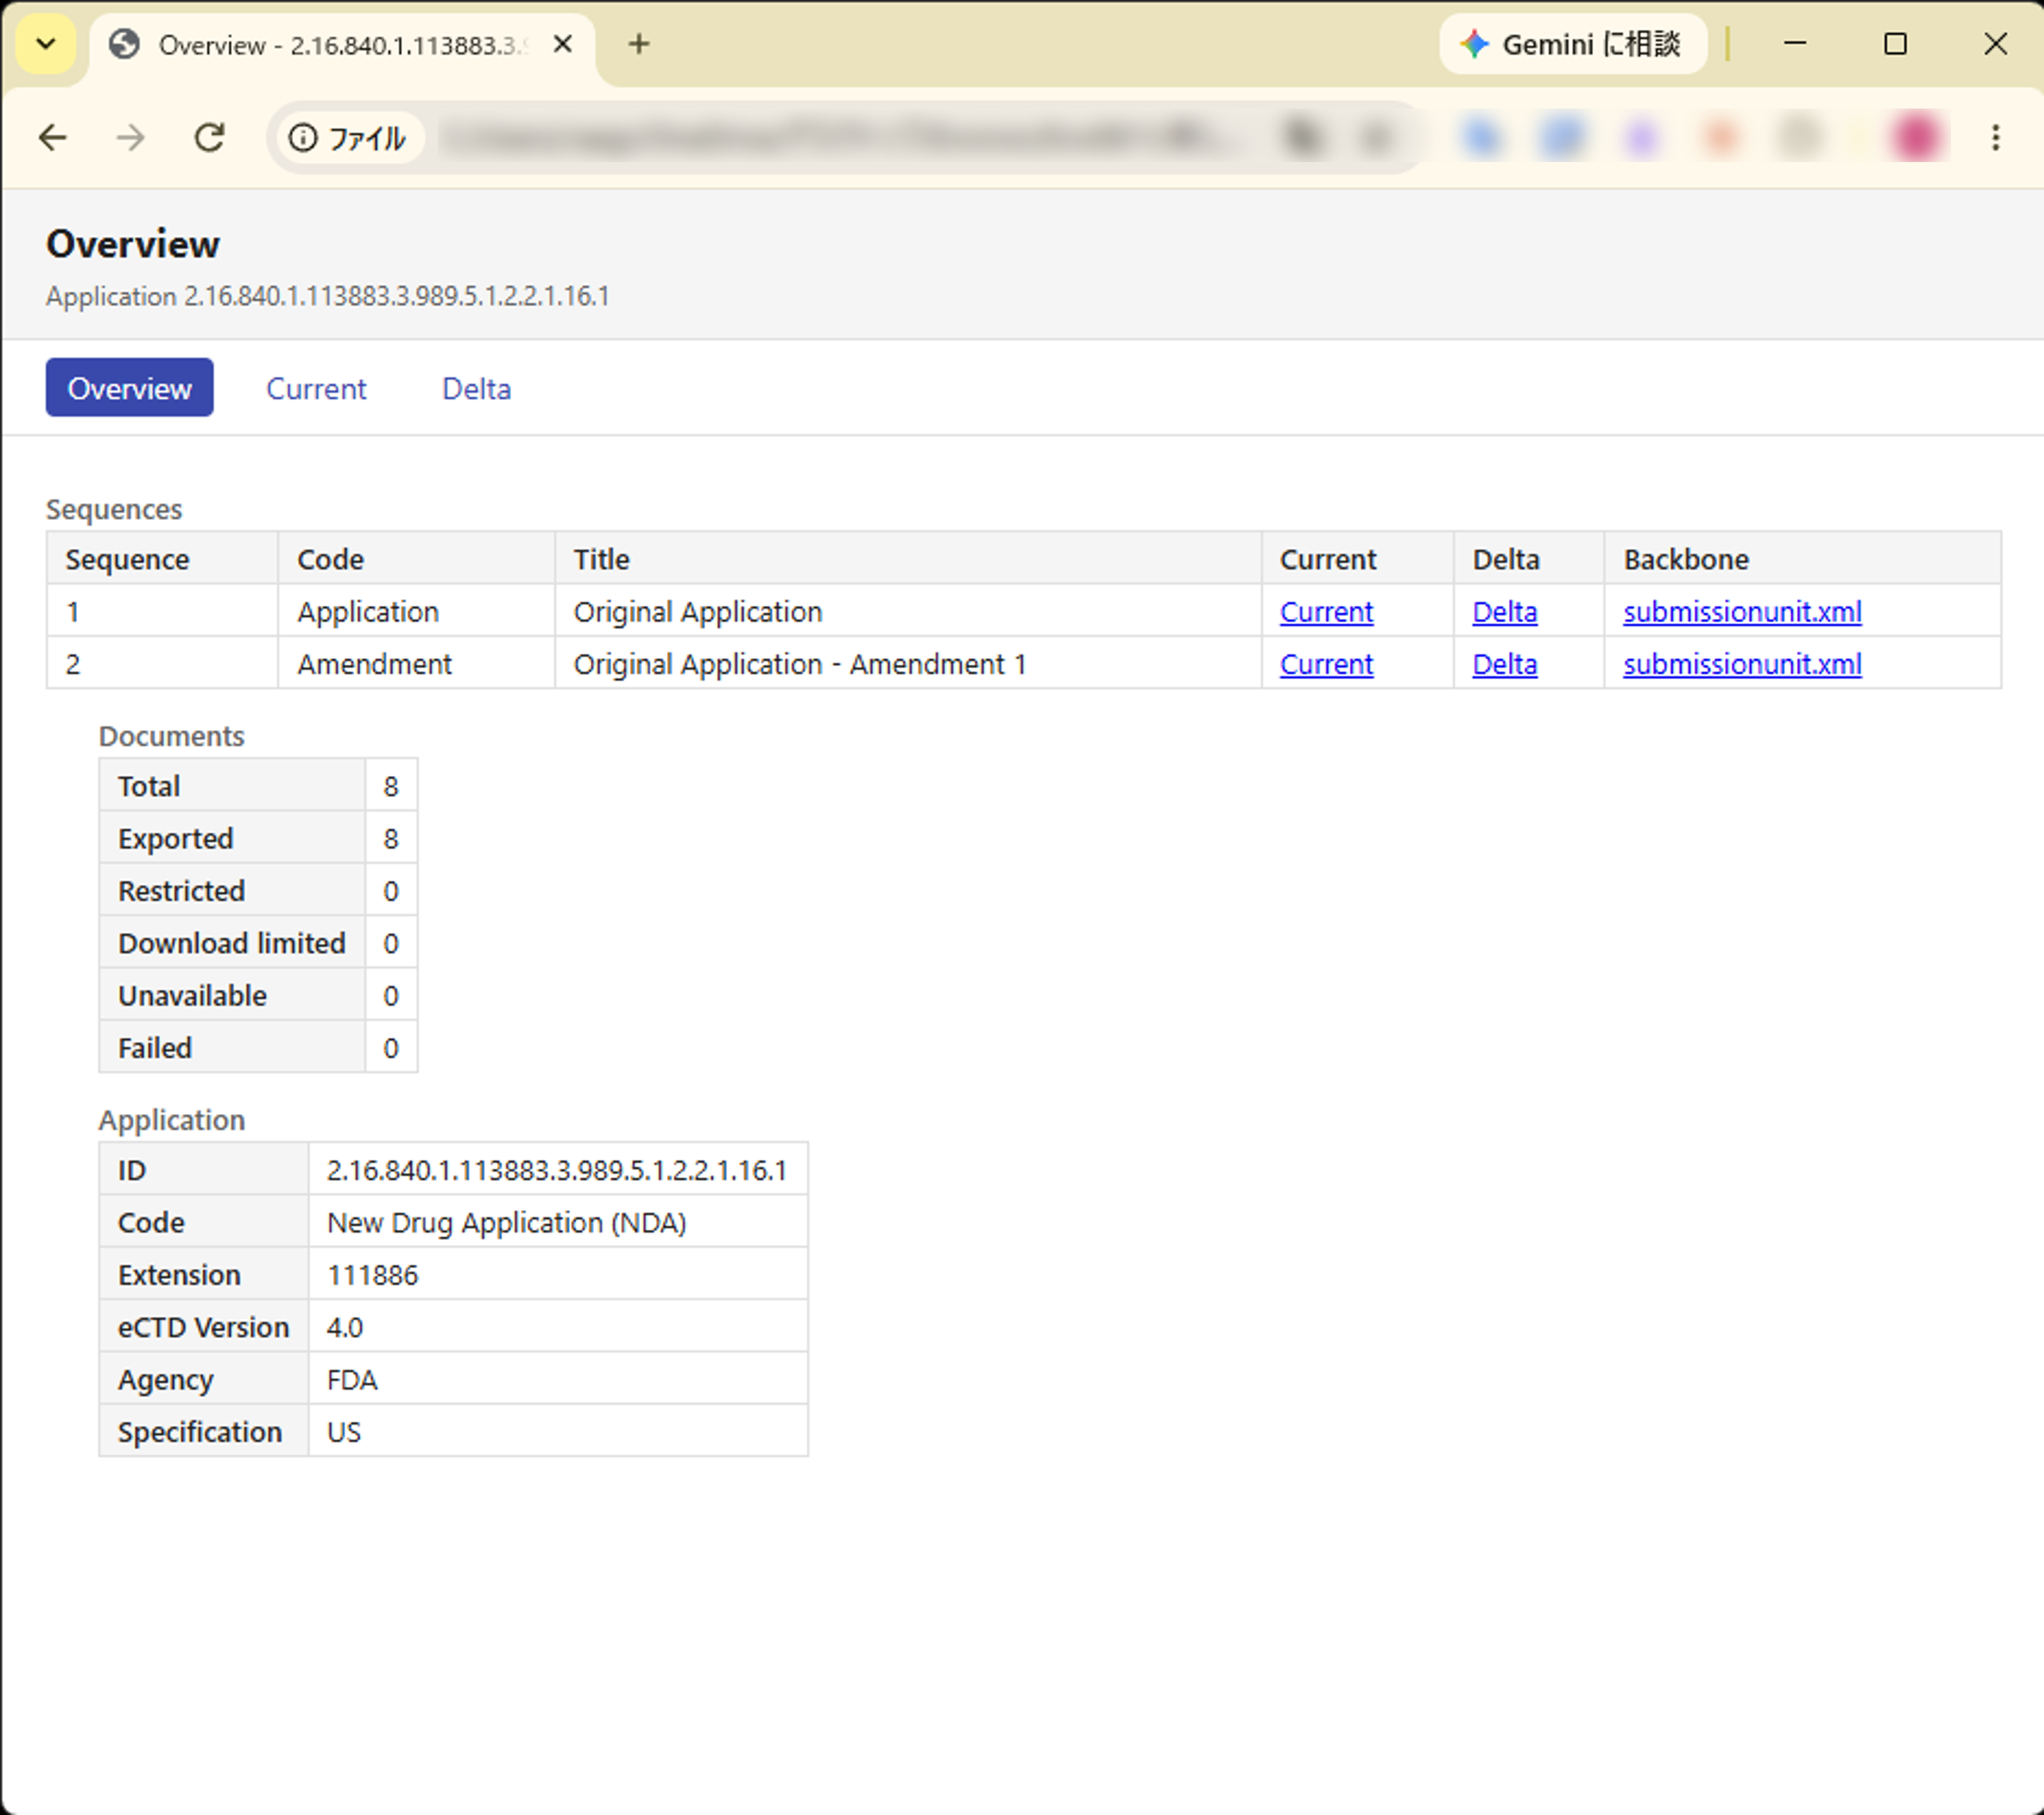
Verify: A folder named <Application ID>_<timestamp> is created in the destination. Double-click index.html in it to open the Overview in a browser.
The export runs in a separate window, so you can keep browsing the CTD tree in the viewing Window while it is in progress.
What is exported
A folder named <Application ID>_<timestamp> is created in the destination. Its contents differ by eCTD version.
For eCTD v4.0
<Application ID>_<timestamp>/
  index.html                       Overview (sequence list / document counts / Application information)
  current-<sequence number>.html   Current tree for that sequence
  delta-<sequence number>.html     Delta tree for that sequence
  assets/                          Stylesheet and script
  backbone/<sequence number>/submissionunit.xml
  files/                           The actual documents referenced from the trees
For eCTD v3.2.2
<Application ID>_<timestamp>/
  index.html                       Overview (sequence list / file counts / Application information)
  tree-<sequence number>.html      CTD tree for that sequence
  assets/                          Stylesheet and script
  files/                           The actual documents, index.xml, and the region-specific XML
In v3.2.2 there is a single CTD tree per sequence, so the output is one page per sequence. Lifecycle operations (new / replace / append / delete) are shown as badges on the tree.
The v3.2.2 index.xml and region-specific XML are not isolated under backbone/; they are placed at the same locations they occupy inside the submission (files/<Application ID>/<sequence number>/), because references made to index.xml from within the submission only resolve at that location. The sequence list in index.html links to the index.xml and region-specific XML of each sequence.
The export covers not only the selected sequence, but every sequence loaded in the viewing Window. The sequence that was selected on the CTD Tree tab when you started the export is only used to decide which link index.html opens first.
Inside files/, documents are stored in the same hierarchy as the viewing screen (Application ID → sequence number → the submission’s relative path). Because of this, cross-references between submission documents written inside PDFs and XML files (relative links) keep working after the export.
What you can do in the exported HTML
- Switch sequences from the fixed bar at the top of the page. In v4.0, if you switch while viewing a Delta tree, the destination also opens as Delta
- Enter a keyword in Filter to narrow down the tree
- Use Expand All / Collapse All to expand or collapse the whole tree
- In v4.0, on green nodes (ContextGroup), open the nested block to see all Keywords. The tree label intentionally omits some keywords for readability, so check here for the complete set
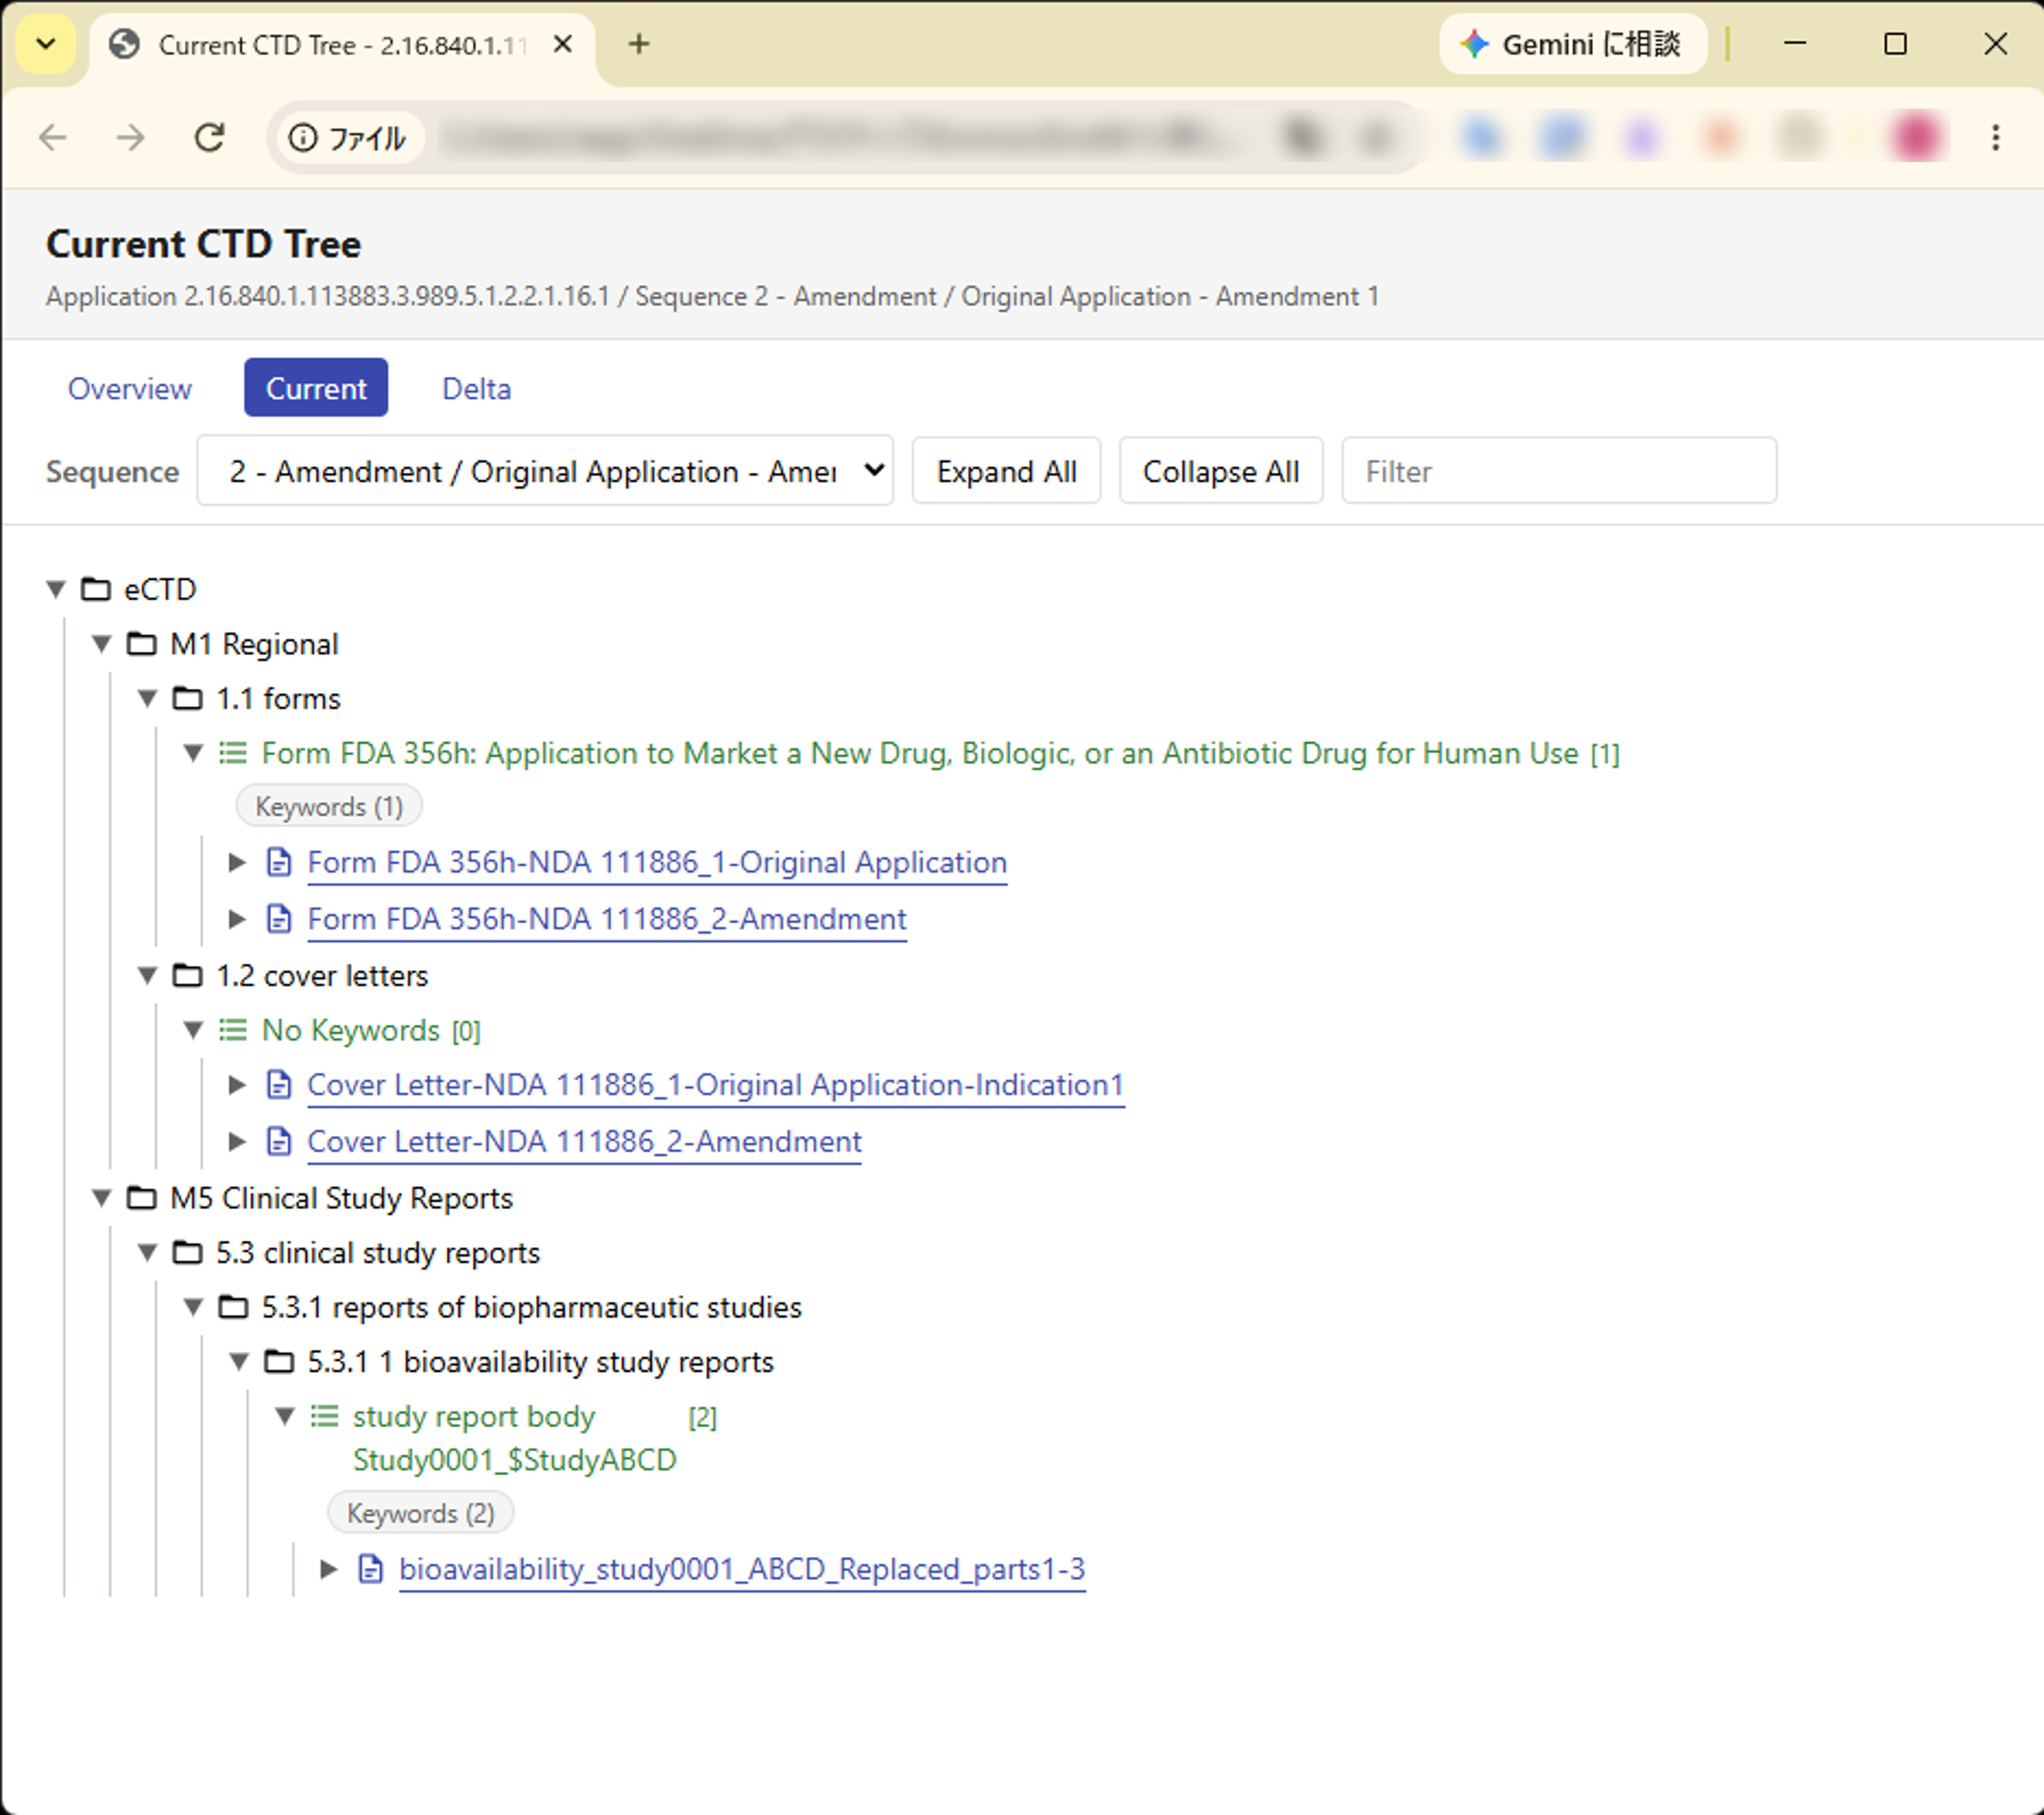
The exported HTML is always in English. It does not follow the app’s language setting (4.2).
Notes
- ⚠ Documents that could not be included because of access restrictions, download restrictions, or retrieval failures remain in the tree without a link, with the reason shown next to them. If even one is missing,
index.htmlshows “This export is incomplete.” at the top. Do not treat such a folder as a complete copy of the submission - Because every sequence is included, the output can reach several gigabytes. Free space at the destination is not checked automatically. Use the sequence and document counts shown before you start as a guide
- If you cancel, the partial output remains in the destination folder. Discard it, or run the export again to completion
- Redistribution of the exported folder cannot be controlled by the app. Filtering based on access rights (8.1) applies only up to the moment of export. Manage who receives it, and what it contains, as an operational matter
- For v3.2.2, STF, define.xml, and the region-specific XML are included as the submission’s own XML files. The Styled tab of the viewing Window (3.7) formats them for display, so they will look different from the export
4. Personal settings (Current User) 📖
4.1 Account information (MyAccount)
Purpose: Check your user information, the UserGroups you belong to, and the Access Keys you inherit. Change your password and DisplayName
Steps:
- Open “MyAccount” from the left menu
- Change your DisplayName or password (Cred method only) in the Information tab
- In the UserGroups / Applications Access / Documents Access tabs, check the permissions granted to you
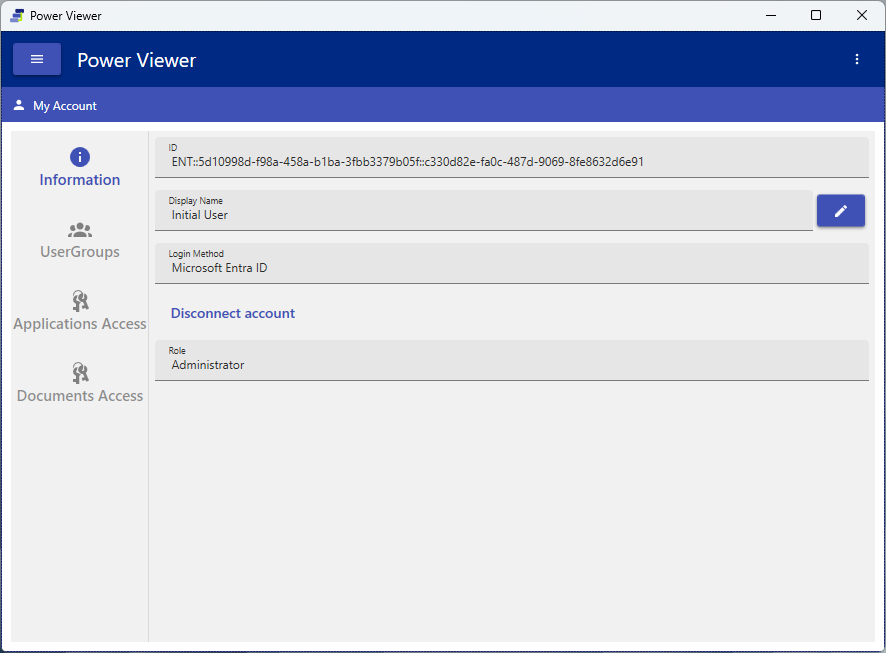
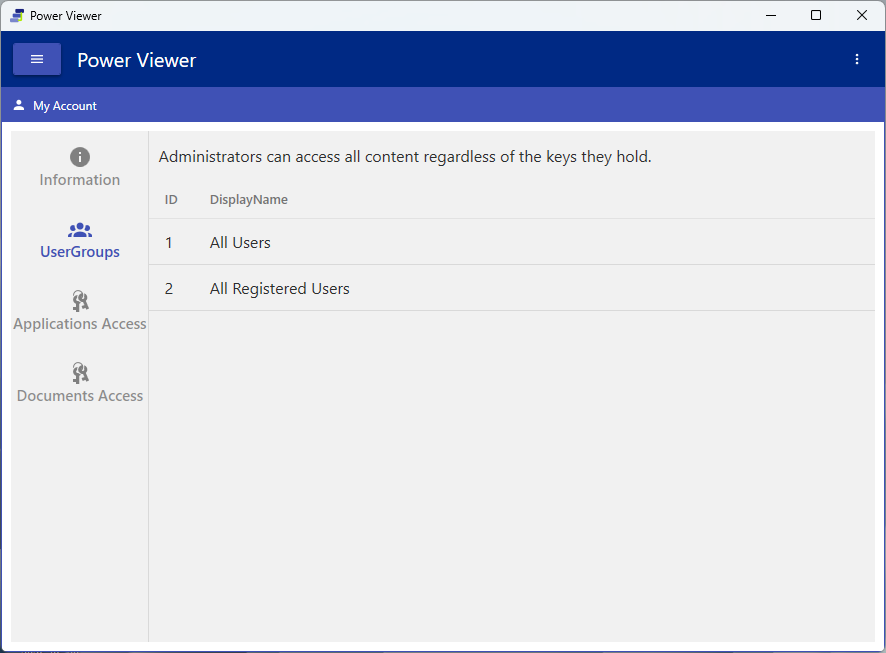
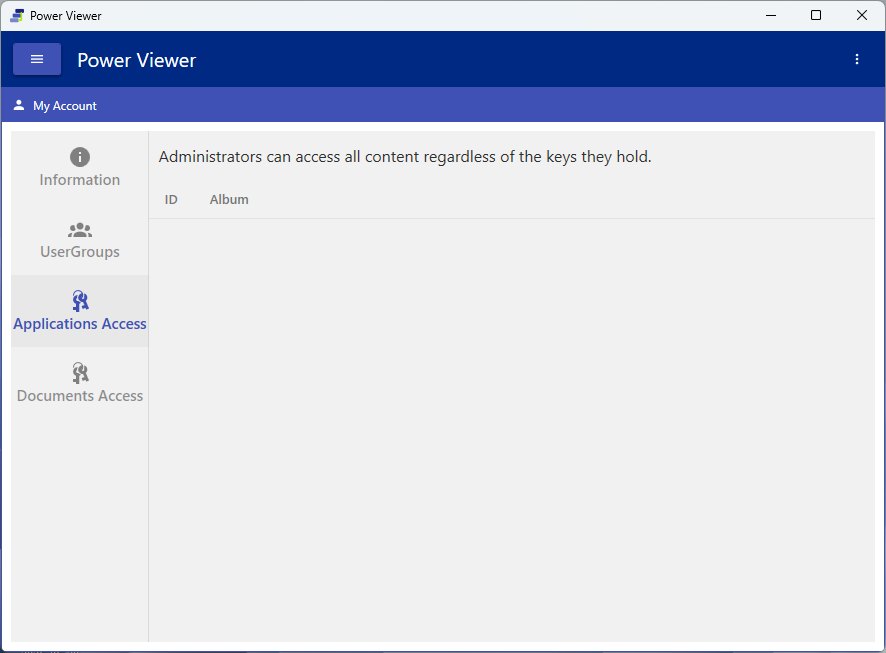
You cannot change your own role (Viewer / Admin, etc.) here. Role changes are made by an Administrator (6.5).
4.2 Settings
Purpose: Change personal settings such as display language, PDF viewer, and paths
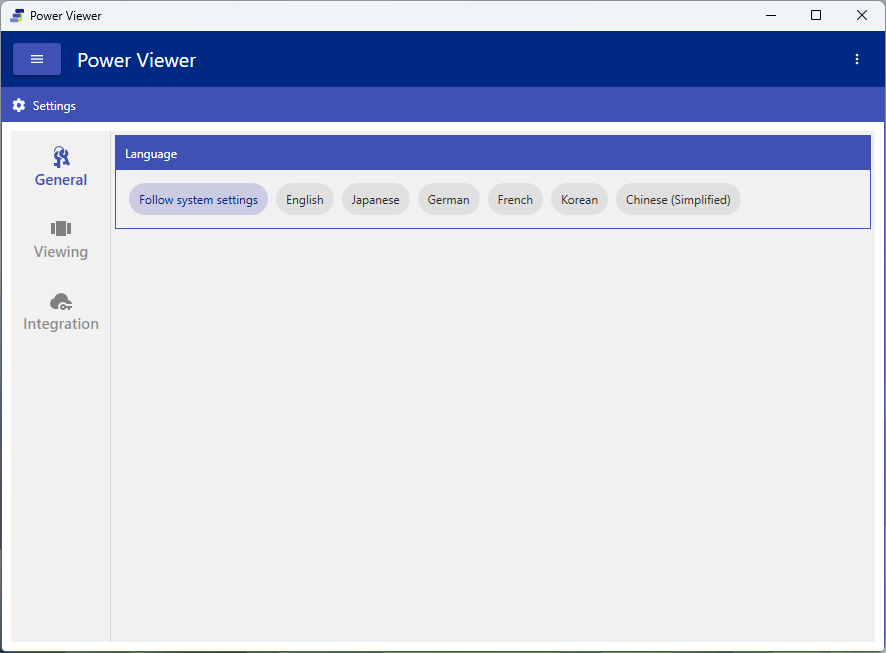
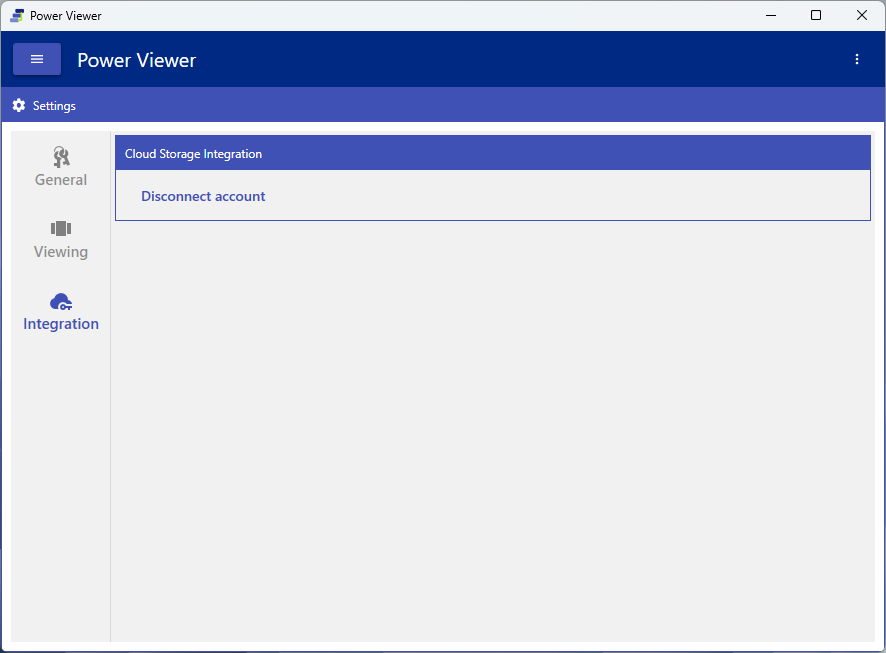
Settings is organized into three tabs: General / Viewing / Integration.
- General – Language: The display language for the UI and manual. You can choose System (follow the OS setting) or one of six languages: English, Japanese, German, French, Korean, and Simplified Chinese. Changes take effect after restarting the application.
- Viewing – PDF Engine: The PDF rendering engine (Default / Edge Engine; see 3.6)
- Viewing – User Root Path: The root folder used as the basis for resolving relative paths
- Integration – Disconnect Account: Deletes cloud storage authentication information (Refresh Tokens). Use this when you want to re-authenticate
If the User Root Path or PDF viewer is enforced organization-wide by group policy, the corresponding setting item is not displayed (7.3). With free use (MemberPortal), the Integration tab is not available.
4.3 CV List
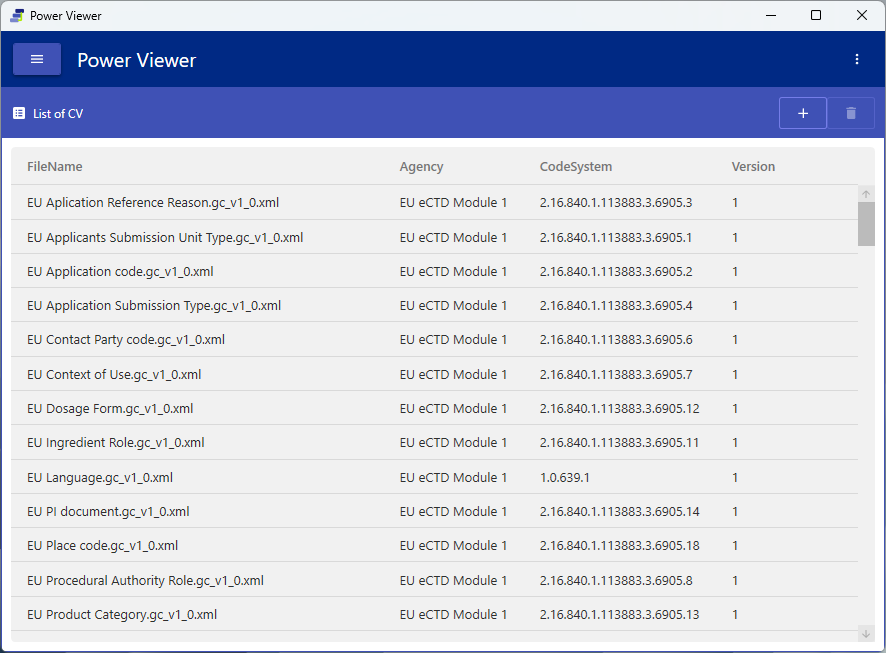
Purpose: Manage CV (Controlled Vocabulary — the managed terminology used in eCTD v4.0) files
In the CV List tab, you can list, add, and remove CV files. The list shows each CV’s file name / authority (Agency) / code system (CodeSystem) / version. Whether the tab appears depends on the group policy setting (the CV List tab display option; shown by default); if it is set to hidden, the tab itself does not appear.
The CV retrieval method (server sync / local) is determined by the functional options in the group policy (ServerCV Download; local by default) (7.3).
4.4 Check announcements
Purpose: Check announcements from us (new version notices, maintenance information, etc.) inside the app
Steps:
- Open “Announcements” from the left menu
- Select an announcement in the list to display its body on the right

Verify: The body of the selected announcement appears in the right pane, and that announcement is marked as read
- Unread announcements have their title shown in bold; selecting a row marks it read immediately.
- Important announcements are highlighted with an icon.
- Announcements can be viewed regardless of whether you have a license key (this is not an administrator-only feature).
Read status is saved per PC. If you log in from a different PC, the read status is not carried over.
5. Deployment and setup ⚙️
5.1 Overview of deployment
Deployment by an administrator generally proceeds in the following flow.
flowchart TD
    A["1. Obtain a license key"] --> B["2. Create an album database"]
    B --> C["3. Create and distribute a group policy file"]
    C --> D["4. Employees each log in and start operating"]
    D --> E["5. Administrator manages access rights"]
Deploying a cloud album database (Hosting)
An album database can be local (a SQLite file) or cloud-based (Hosting: a database on servers operated by Power Office) (8.2). Even when using the cloud version, you first prepare a local album database and group policy file, log in as an administrator, and then add the cloud connection target.
flowchart TD
    A["1. Create a local album database (5.3)"] --> B["2. Create a group policy file that registers it (5.4)"]
    B --> C["3. Log in to that database as Administrator"]
    C --> D["4. StartWindow → Group Policy → Album Database,<br/>add connection type Hosting (enter Display Name & Tenant ID)"]
    D --> E["5. Log in again and select the Hosting target on the login screen"]
- The screen for adding a Hosting connection is opened from the StartWindow after login, not from the group policy file creation wizard (7.1). Only local (SQLite) can be registered in the group policy file creation wizard.
- All you need to register is the Display Name and the Tenant ID — no file path or connection string.
Prerequisites:
- The Tenant ID is provided by us. A separate contract is required to use the cloud album database.
- With a Hosting album database, you authenticate with a user account that is pre-registered on the server. The first Administrator must be registered on the server side; you cannot create the first user from the client. Logging in with an unregistered account results in an error.
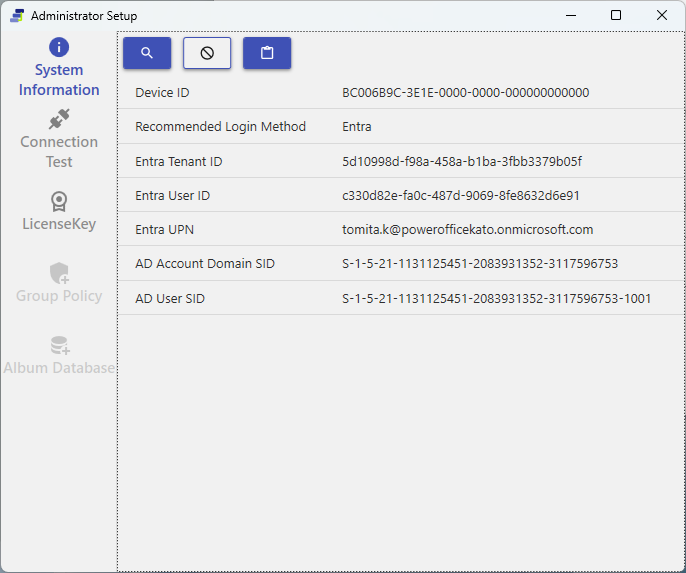
5.2 Check the information required to issue a license key
Purpose: Check the information required to issue a license key
Steps:
- Open the environment setup Window
- Run the system environment survey (Entra login is optional; you can cancel if not needed)
- Perform a connection test
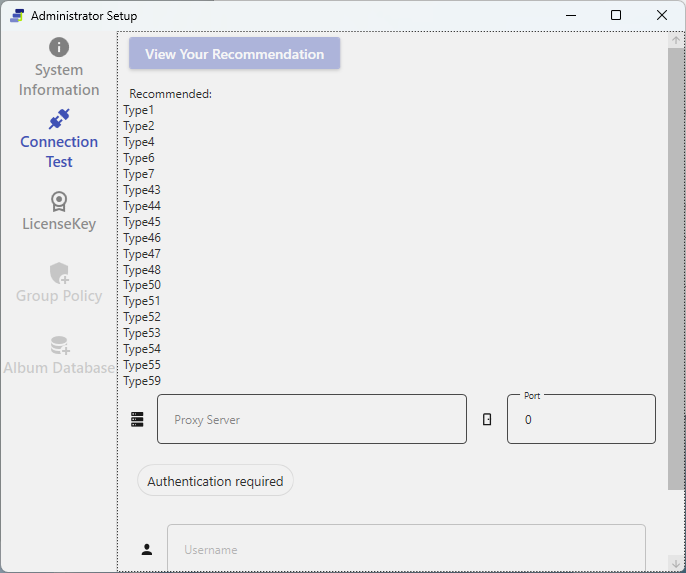
If the connection test results in an error, check your network / proxy settings (7.4).
5.3 Create an album database
Purpose: Create the database that is the center of eCTD management
Prerequisites: A valid license key has been entered
Steps:
- Specify the destination folder for creating the album database
- Set the album database password (at least 8 characters; enter it again to confirm)
- Configure the login method
- Run the creation
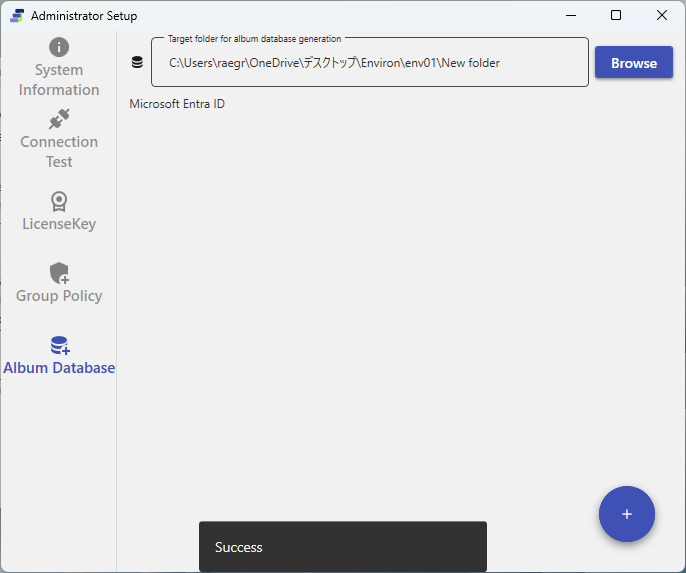
Verify: The database is created, and the user who ran the creation is registered with the Administrator role
From v3.0.0, the album database encryption password is set by the administrator (the former shared password has been removed). Creation is blocked if it is shorter than 8 characters or does not match the confirmation entry. If you lose this password, the database can no longer be opened. It is also needed when registering the database into a group policy file, so keep it safe.
5.4 Create and distribute a group policy file
Purpose: Create a file that bundles company-specific settings and distribute it to employees
Steps:
- Create it by specifying the album database path, name, and password, and the HTTP connection settings
- Inform employees of the path to the created file (employees set this path at their first login)
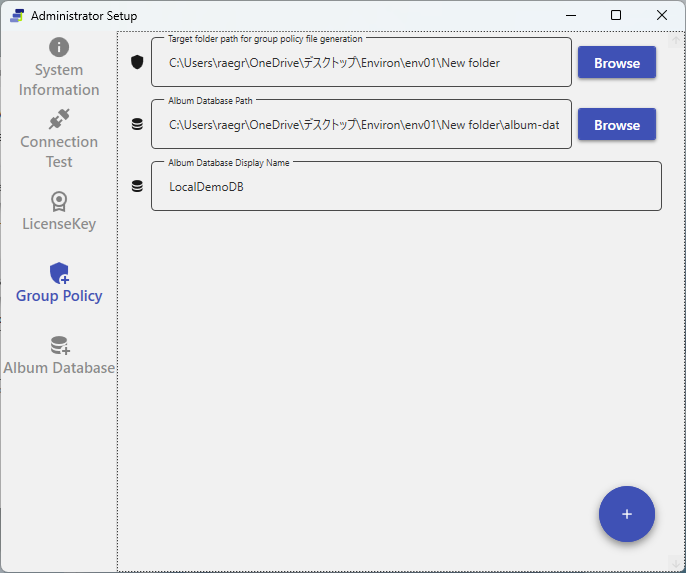
When registering an existing album database into a group policy file, you enter the album database password each time (the one set in 5.3). The connection is actually tested at registration, so an incorrect password is never saved as-is.
The group policy file is essential for operation in a local environment. We recommend placing it on a shared server (sync/distribution operation is also possible). See 8.2 for details.
5.5 Choose a login method (Entra / AD / Cred)
Paid login using a license key has three authentication methods. The method is tied to the license key and operated via group policy.
| Method | Overview | Notes |
|---|---|---|
| Entra (recommended) | SSO via Entra ID (Azure AD) | Centrally managed by organization policy |
| AD | On-premises Active Directory | For in-house domain environments |
| Cred | ID / password | A method for when the above cannot be used |
For individual use without a license key, a separate free login (Microsoft / Google / email OTP) is available. With free use, the album database and cloud storage integration are not available.
5.6 About license keys
A license key is a signed key that includes the permitted company key, authentication method (Entra / AD / Cred), expiration date, and more. The signature is verified inside the application, so validating the key itself does not require a server connection.
A key mainly contains the following information.
- Company keys (companyKeys): Identifiers of the companies permitted to use the key
- Authentication method (authMethod): One of Entra / AD / Cred. It must match the login configuration in the group policy
- Generation IDs (generationId / compatibleGenerationIds): Represent compatibility with album database generations. You cannot connect to a database of an incompatible generation
- Expiration date: Expired keys become invalid
Operational points:
- A key can be recorded in a group policy, and employees can use the key recorded in the group policy specified by path (7.2).
- Keys that are expired, have an invalid signature, or are for an unsupported version are treated as invalid.
- Keys with a product name other than
PowerViewerare not accepted. - For how to diagnose a key reported as invalid, see 8.5.
- With the cloud version (Hosting), the correspondence between the company key (companyKey) and the Tenant ID is validated on the server side (the app does not check it). If the Tenant ID is wrong, the app cannot determine the cause, and the error from the server (Forbidden / Unauthorized) and the server-side message are shown (8.5).
The CV retrieval method (server sync / local) is controlled not by the “license plan” but by a functional option in the group policy (the ServerCV download option) (7.3).
6. Operate the album database ⚙️ 💎
An album database can be local (a SQLite file) or cloud-based (Hosting) (8.2). The operations in this chapter (registering eCTDs, organizing Applications, access rights, user management, logs) work the same way for both. For how to add a cloud connection target, see 7.1.
6.1 Understand the data model
The album database is composed of the relationships among Album / Application / SubmissionUnit / Access Key. Adding a SubmissionUnit automatically generates the corresponding Application.
erDiagram
    Album ||--o{ Application : "bundles"
    Application ||--o{ SubmissionUnit : "auto-generated on add"
    SubmissionUnit ||--o{ FolderPath : "multiple, with Priority"
    Album ||--|| ApplicationAccessKey : "one, auto-generated"
    Album ||--o{ DocumentAccessKey : "multiple, self-creatable"
- Album
- Application — auto-generated when a SubmissionUnit is added
- SubmissionUnit — points to an actual eCTD (Sequence Folder). Multiple Folder Paths can be registered with a Priority
- Application — auto-generated when a SubmissionUnit is added
- Access Key
- Application Access Key … one per Album, auto-generated (6.4)
- Document Access Key … multiple, self-creatable (Allow/Deny, Deny takes precedence)
6.2 Register an eCTD (add a SubmissionUnit)
Purpose: Register a new eCTD in the album database
Steps:
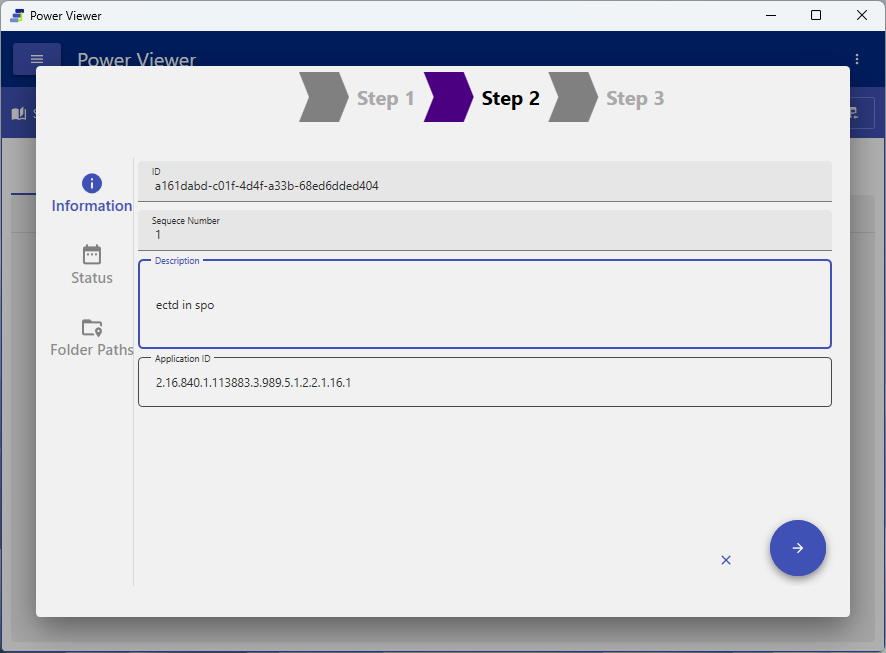
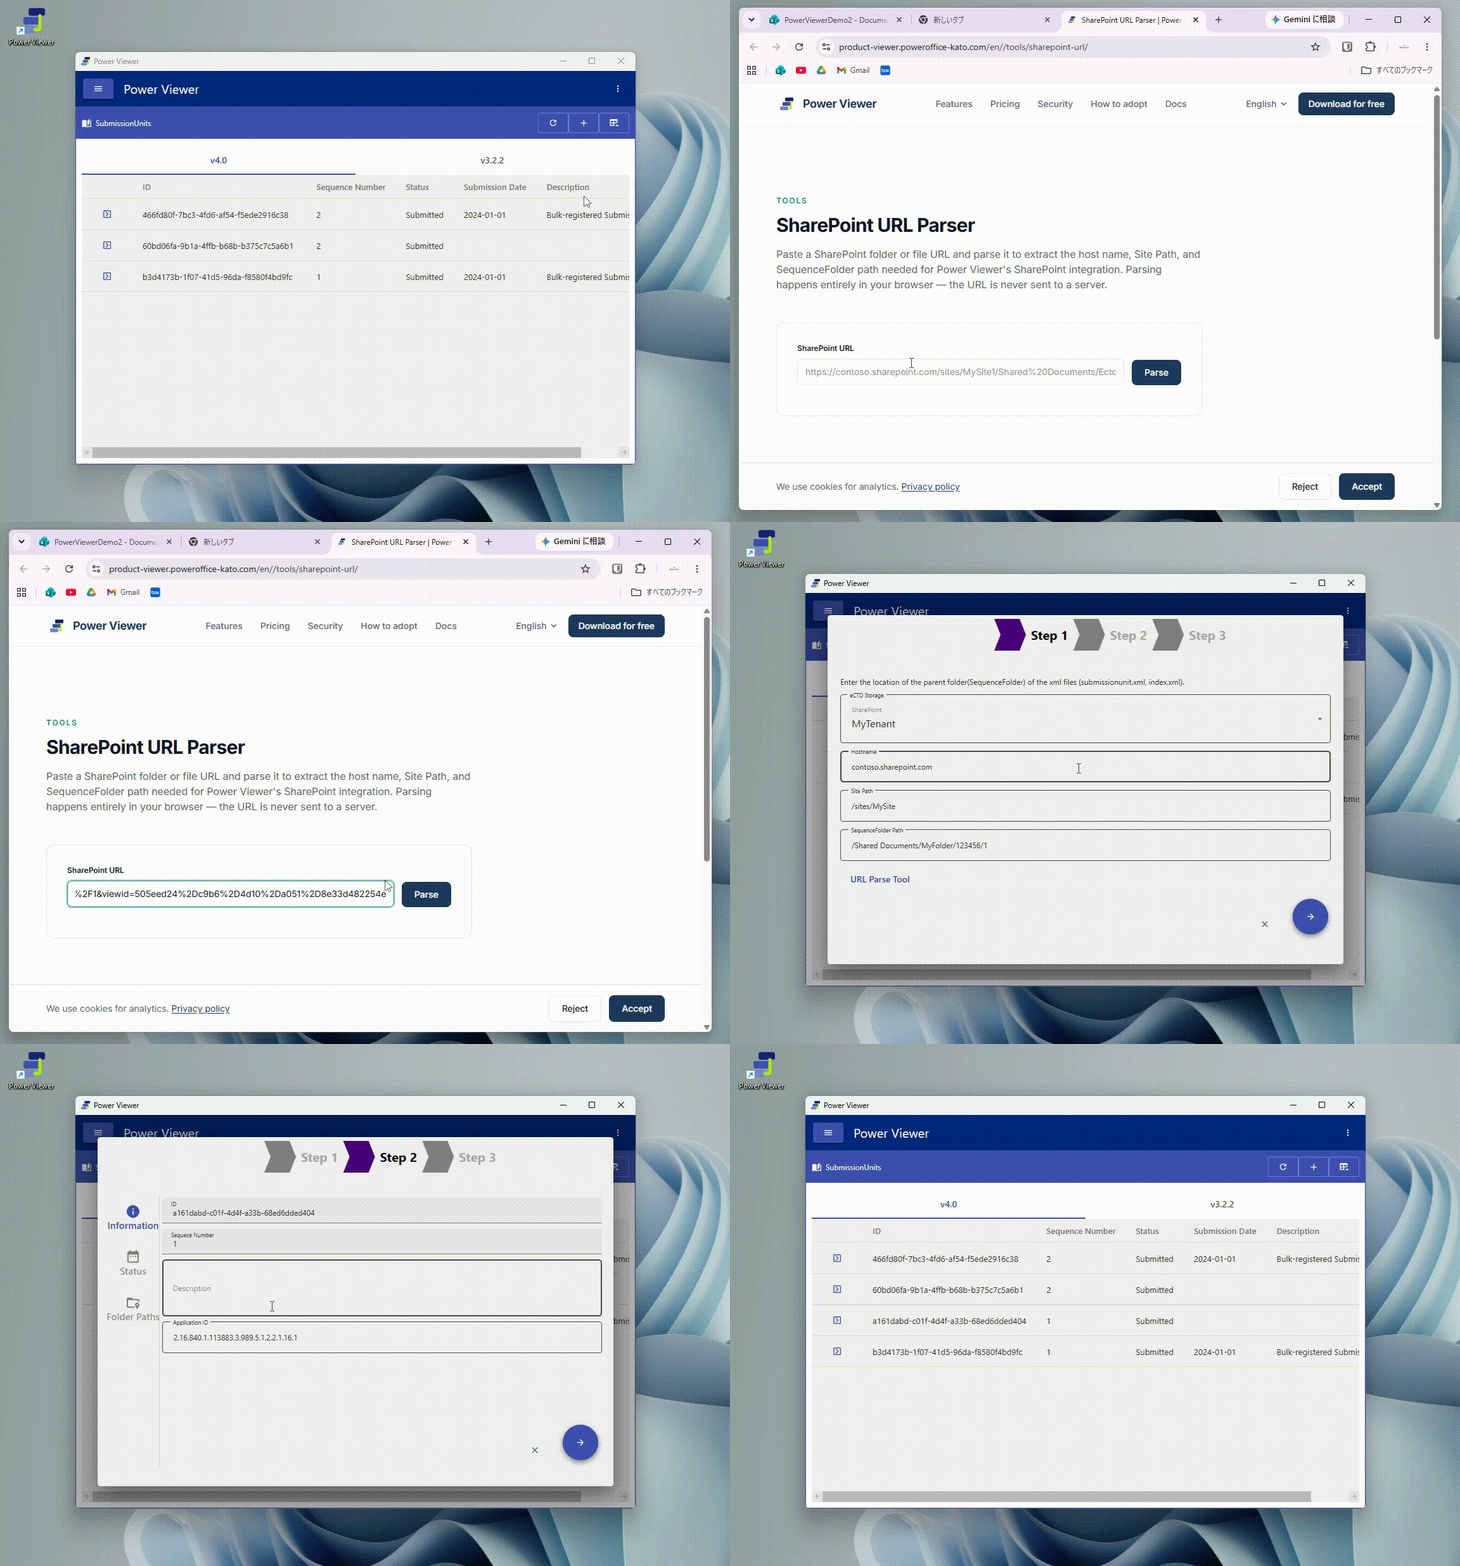
- On the SubmissionUnits screen, open the add wizard
- Specify the Sequence Folder path or folder ID (the required folder identifier differs depending on the type of eCTD Storage)
- Edit the SubmissionUnit information
- Run the registration (progress is shown while it runs; see the tip below)
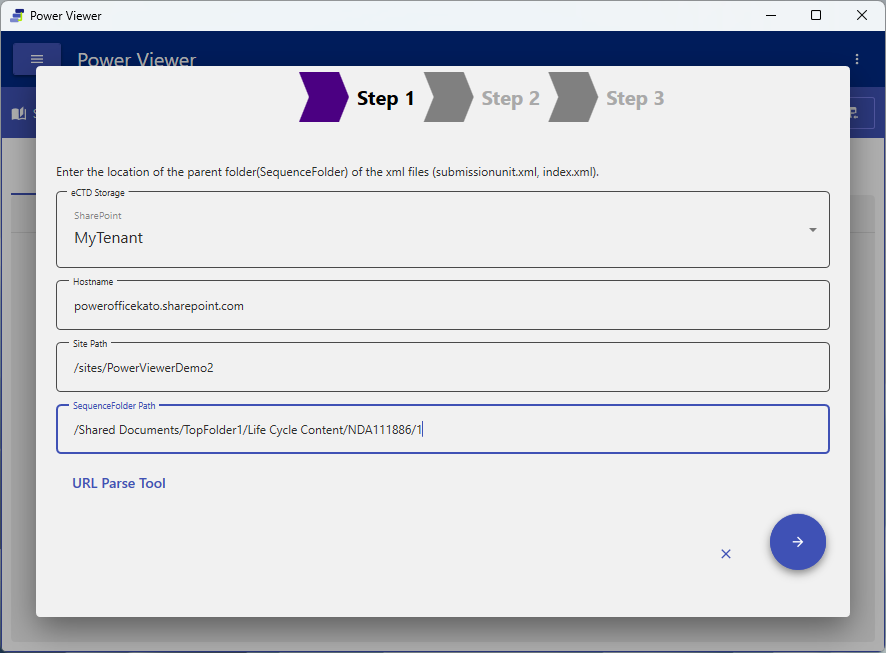
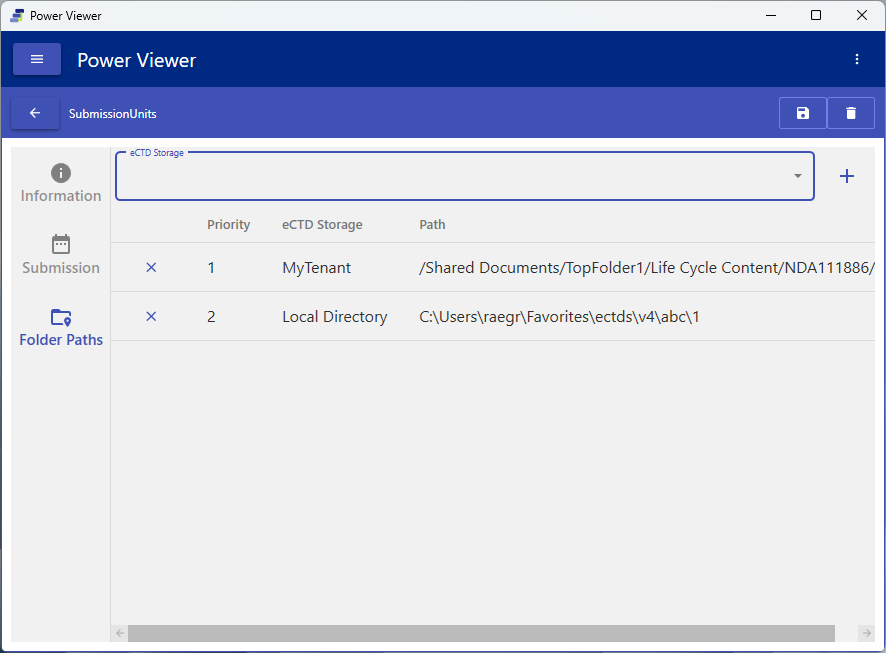
Tip: You can register multiple Folder Paths with a Priority for a single SubmissionUnit.
Progress during registration: While registration runs, the confirmation screen shows a progress bar and the current step. With the cloud version (Hosting), it communicates with the server per document and takes time, so you can follow the progress (shown in English). While registration is in progress, the dialog cannot be closed by clicking outside it (to prevent closing before it completes and leaving the result out of the list). With local (SQLite), the process completes in a single batch, so little to no progress is shown.
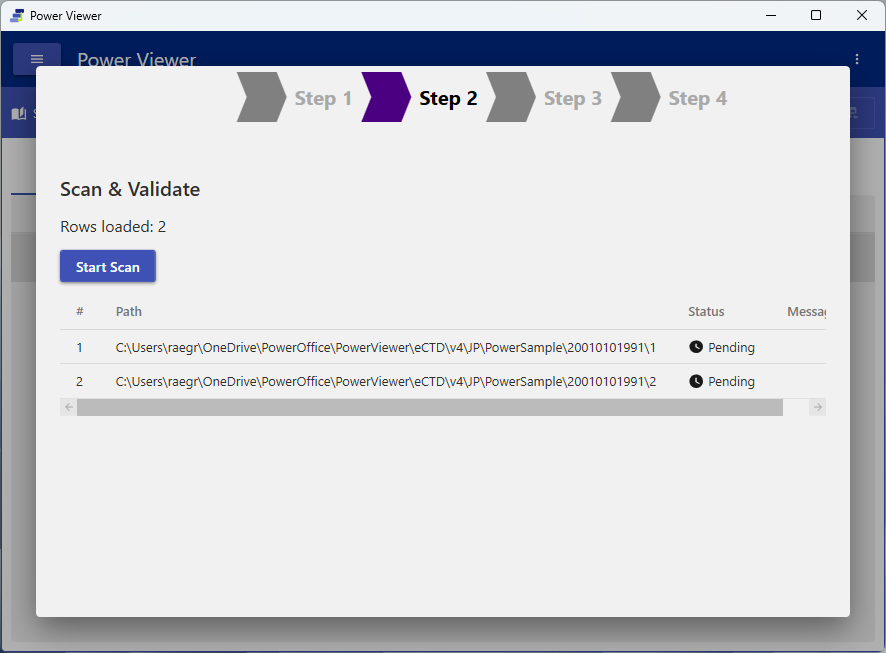
Bulk registration: Multiple SubmissionUnits can be bulk-imported via CSV (a 4-step process: select storage & load CSV → scan & validate → preview → register).
- A single import can register up to 100 rows.
- The CSV header is
path,description,submission_status,submission_date,application_ids(for SharePoint Custom connections only, two extra columnshostname,site_path,are prepended). A CSV whose header does not match cannot be loaded. - Scan results classify each row as Valid (registrable) / Failed (error) / Duplicate (already registered), and only Valid rows are registered.
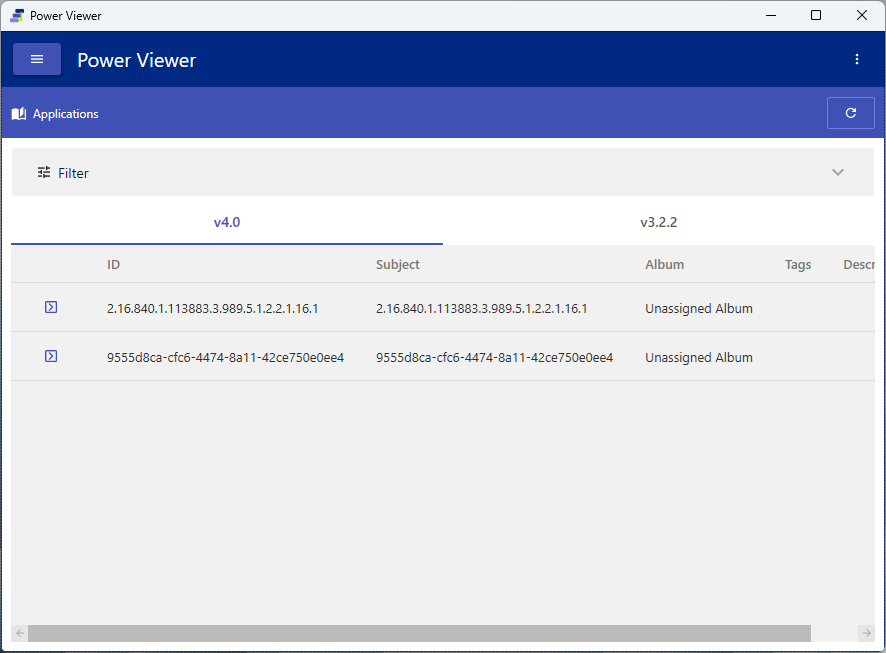
6.3 Organize Applications
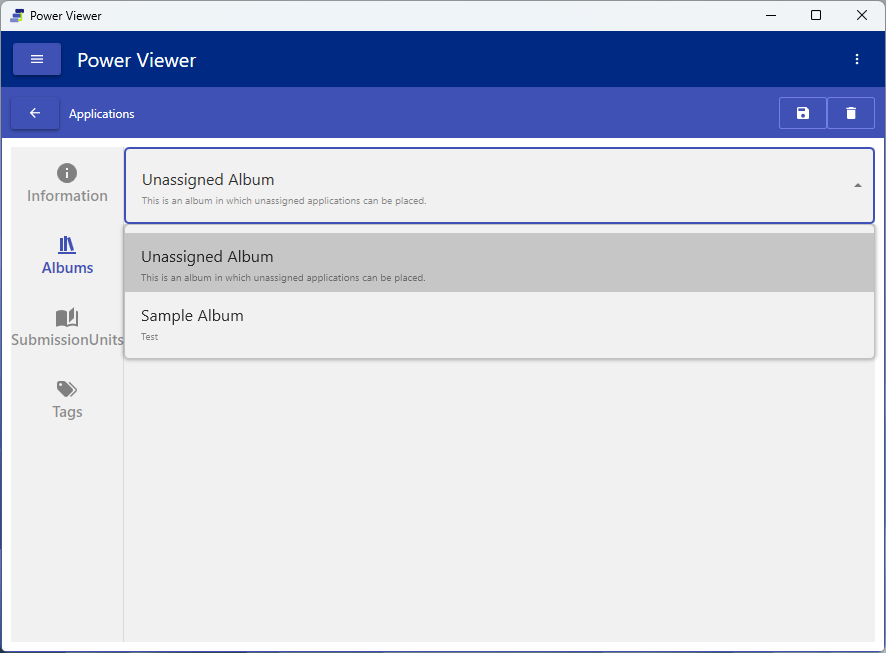
Purpose: Link Applications to Albums and apply Tags
Steps:
- On the Applications screen, select the target Application
- Edit the basic information, the Album it belongs to, and its Tags
- Save
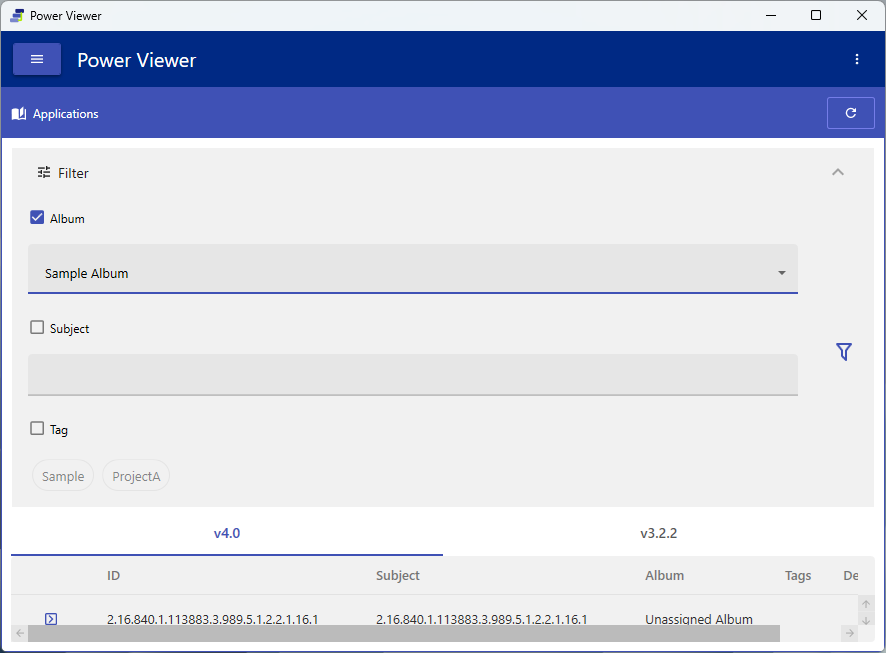
Tip: The list can be filtered by Tags and other criteria using the filter panel.
6.4 Design access rights
Purpose: Design whether access is allowed at the Application / Document level
Access rights are designed with two types of Access Key.
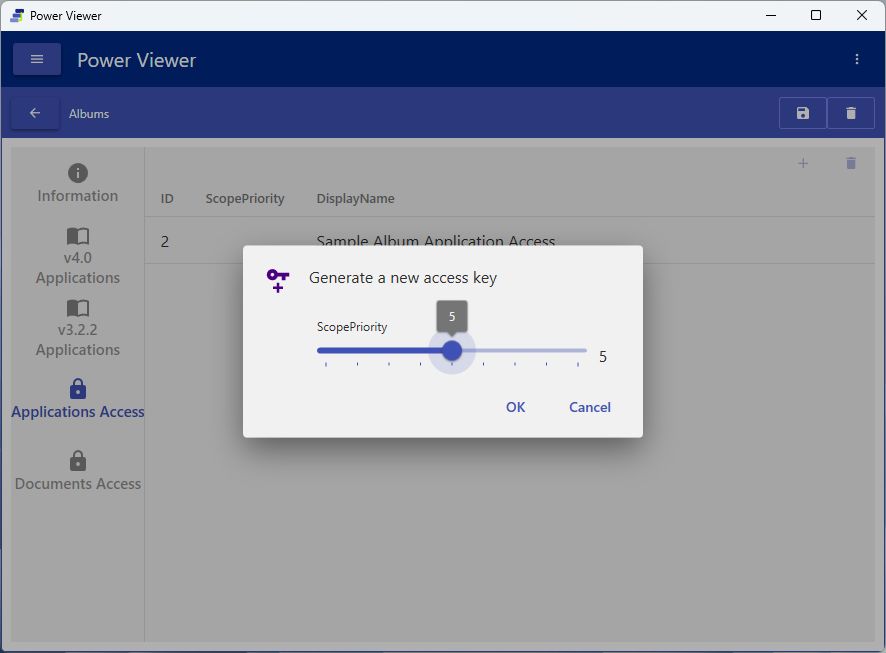
- Application Access Key: A key auto-generated one per Album. Its type is View only. It makes all Applications in the corresponding Album viewable.
- Document Access Key: A key used for fine-grained control at the document level. It has Allow / Deny, and Deny takes precedence (multiple can be specified).
Scope restriction by Priority (Scope Priority): An Application Access Key can set a lower bound on the Priority of viewable Folder Paths (corresponding to the Priority-ranked Folder Paths in 6.2). If unset, there is no restriction (all Priorities are viewable); when a user holds multiple keys, the widest (largest) value applies. Administrators are never restricted. A key with this setting is displayed in the form “Priority ≥ n”.
Document Access Key Types (9 total):
| Type | Control target | Setting value (ControlValue) |
|---|---|---|
| All | All files | Not required |
| PathContains | Files whose path contains a specified string (custom) | String (multiple allowed) |
| SHA256 | Specific files matching a SHA256 (custom) | Hash value (multiple allowed) |
| MD5 | Specific files matching an MD5 (custom) | Hash value (multiple allowed) |
| Extension | Files with a specific extension (custom) | Extension (e.g. .pdf, multiple allowed) |
| M5ExceptedDatasets | M5 excluding Datasets (for JP) | Not required |
| STDM | Only files under the SDTM (Study Data Tabulation Model) folders within M5 | Not required |
| ADaM | ADaM within M5 only | Not required |
| Download | Download permission (Allow only). The only key that controls whether downloading is allowed | Not required |
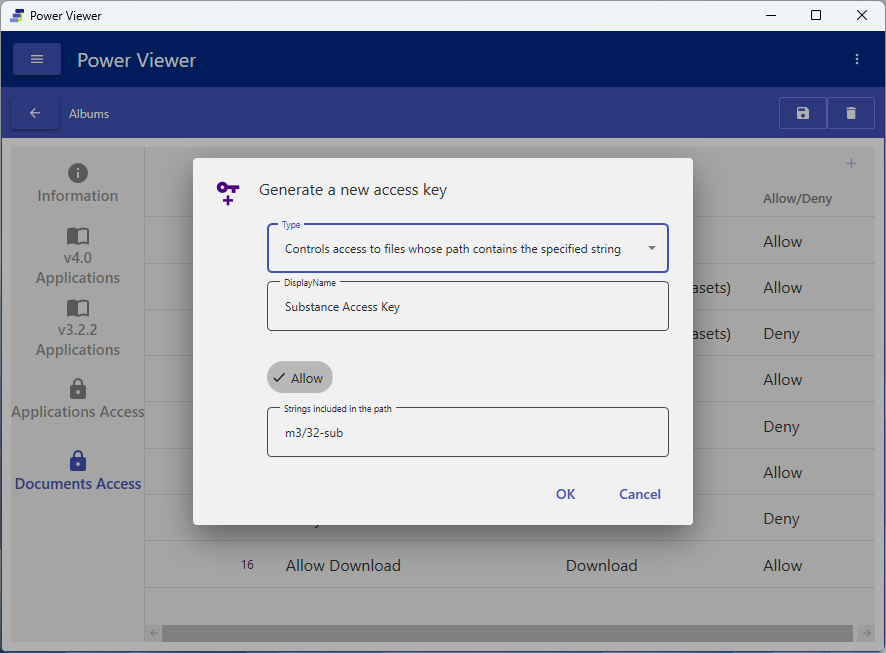
The four types you can create as custom are PathContains / SHA256 / MD5 / Extension. The others are system-defined and cannot be edited. For the concepts in detail, see 8.1.
6.5 Manage users and groups
Purpose: Change user roles, organize groups, and grant Access Keys
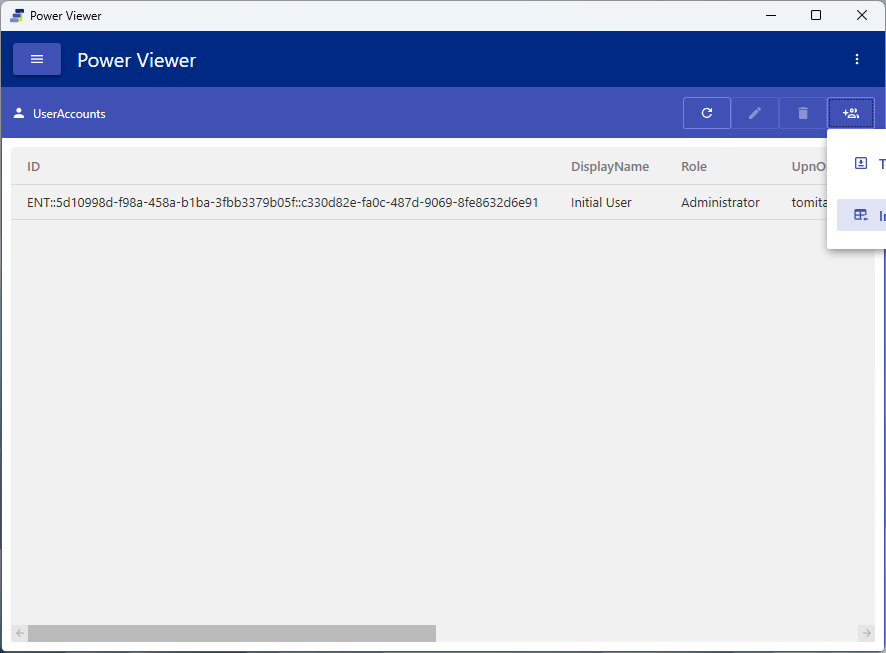
Steps (UserAccounts):
- Open the UserAccounts screen (users are automatically created as Guest at their first login)
- Change the target user’s role (Guest → Viewer / Admin / GroupPolicyEditor)
- Bulk-register via CSV as needed
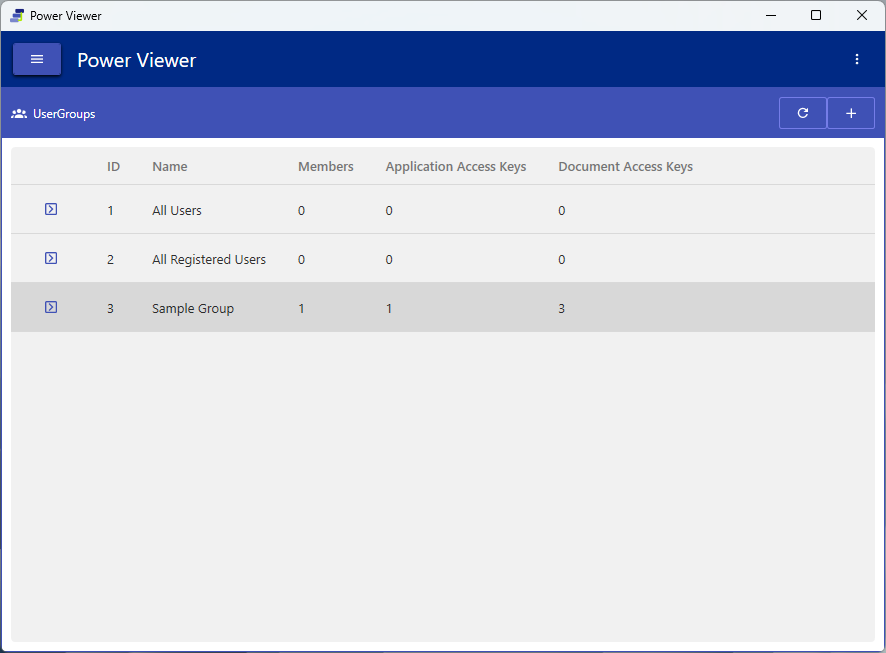
Steps (UserGroups):
- Create/edit a group on the UserGroups screen
- Assign members, Application Access Keys, and Document Access Keys
- Confirm with the save button
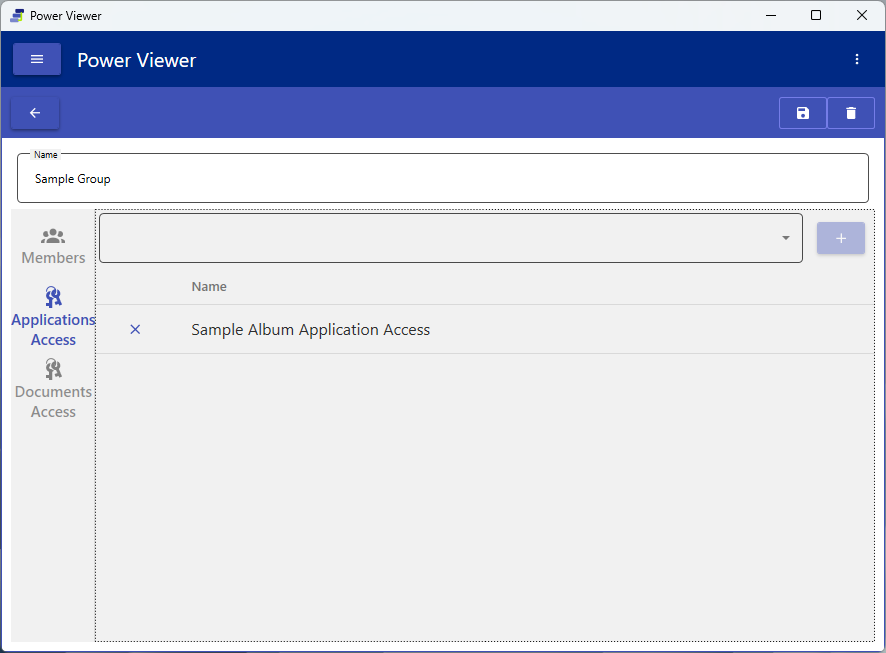
You cannot change your own role. For the relationships among roles, groups, and keys, see 8.1.
6.6 Integrate cloud storage
Purpose: Register the cloud storage that serves as the destination for SubmissionUnits
On the eCTD Storages screen, register the available storage destinations. The currently available providers are as follows.
| Provider | Authentication method |
|---|---|
| Local Directory | Local / network folder |
| SharePoint (Custom) | OAuth2 |
| Box (Custom / Hosted) | OAuth2 |
| Google Drive (Custom / Hosted) | OAuth2 |
| Veeva Vault (BETA) | OAuth2 |
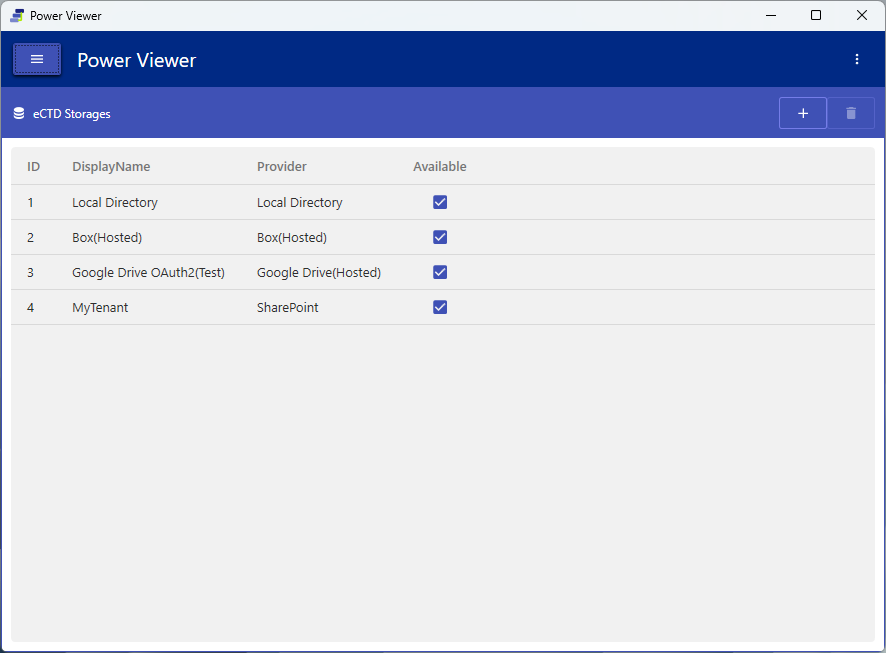
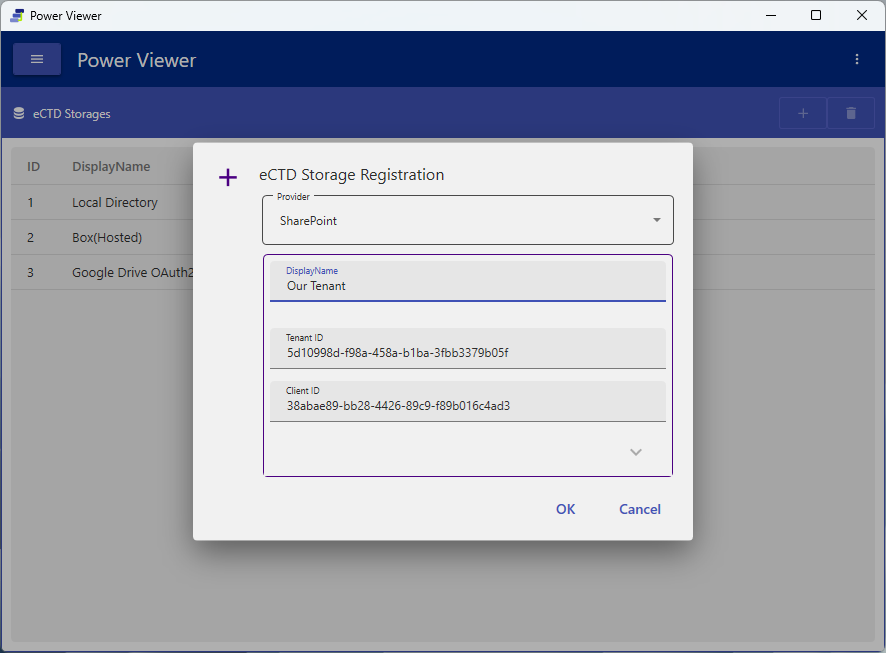
There are two connection models: Custom, which uses your own OAuth client, and Hosted, which uses a client provided by Power Office (Delegated Custom is a variant of Custom in which Power Office assists with the registration). For per-provider setup steps, see the eCTD Storages guide. Registering a cloud provider may require OAuth app configuration (client ID, etc.) in that vendor’s admin console. Storage that is referenced by a SubmissionUnit is locked and cannot be deleted.
Terminology note: The Hosted model here refers to the OAuth method for the storage that holds the actual eCTD files. It is a different concept from Hosting, the connection type of the album database itself (the cloud album database; see 8.2).
6.7 Check audit logs
On the Logs screen, you can review the record of operations performed on the album database. From v3.0.0, recording is automatic and its coverage has been expanded. Five kinds of operations are recorded: login / create (Create) / update (Update) / delete (Delete) / log compression (LogCompression).
Recorded targets are the creation, update, and deletion of Albums / Applications / SubmissionUnits / Documents / Application Tags / Application Access Keys / Document Access Keys / eCTD Storages / User Accounts / User Groups. Access-rights changes (adding, changing, or deleting Access Keys) are included.
- The screen has three columns — Date(UTC) / User / Activity — shown newest first (read-only; you can copy rows with Ctrl+C). There is no filter or search UI.
- Timestamps are recorded in UTC. Note the difference from your local time.
- For updates (Update), the before and after values are also recorded (e.g. “Rename UserGroup: Sales to Sales Division”).
- Logs can be archived (compressed) and removed from the DB, but the fact that a compression was performed is itself recorded in the log.
- Only Administrators can view the audit logs.
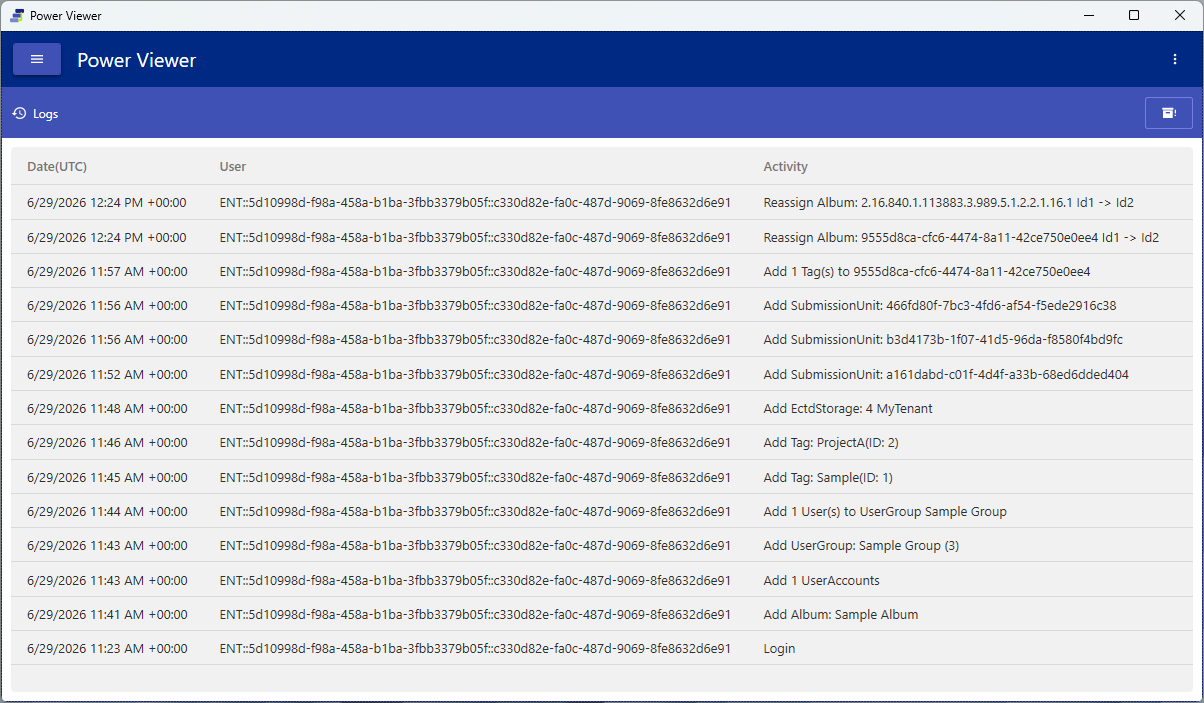
Archiving (compressing/removing) cannot be undone. Pressing the archive button at the top right shows a confirmation dialog. We recommend backing up the current logs before running it.
6.8 Other data views (Documents / Tags)
-
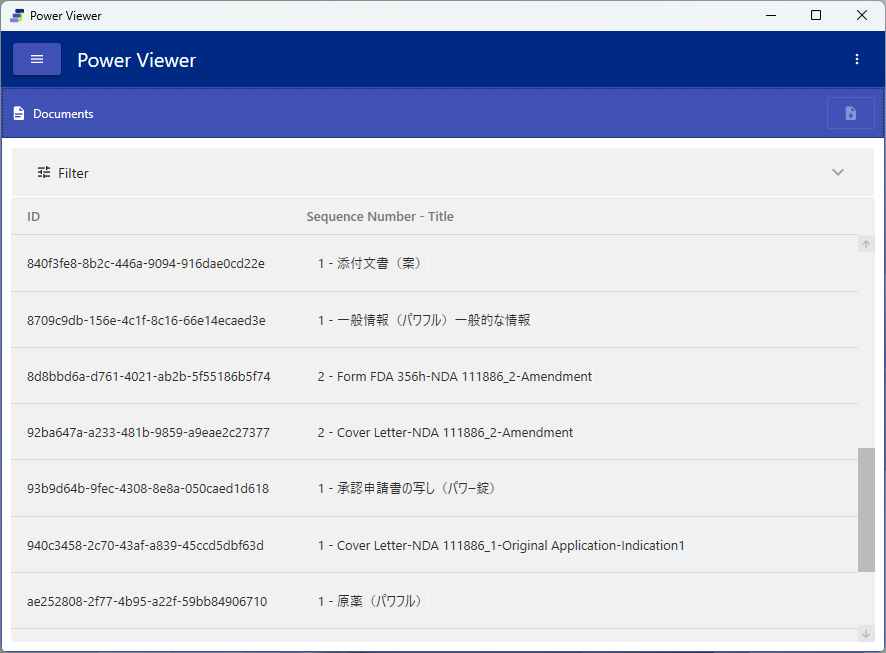
Documents: The load button displays a list of the documents (PDFs, etc.) registered in the album database. Each document carries its path and hash values (SHA256 / MD5), which are what the Document Access Keys (PathContains / SHA256 / MD5; see 6.4) match against. This view is also useful for looking up a hash when you want to allow or deny one specific document.
-
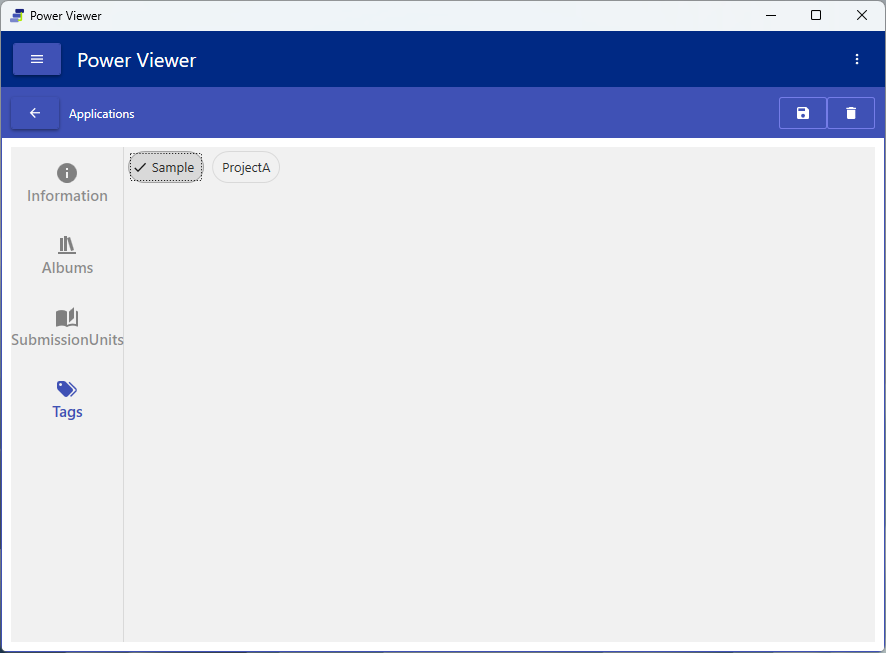
Tags: Add and remove Tags used for classifying Applications. Tags can be used for filtering in the filter panel of the Applications screen (6.3).
7. Configure group policy ⚙️
Editing group policy can be done with the Administrator or GroupPolicyEditor role. The group policy file itself is a password-protected settings file that bundles the license key, album database connection settings, functional options, and HTTP connection settings (8.2).
7.1 Album database settings (multiple registrations)
You can register multiple album database settings in a single group policy. When multiple are registered, users select the connection target at login (1.2).
There are two connection types:
| Connection type | What you register |
|---|---|
| SQLite | Display name, album database file path, password |
| Hosting (cloud) | Display Name, Tenant ID |
A Hosting connection is registered from this list (StartWindow → Group Policy → Album Database) via “Add”. The group policy file creation wizard (5.4) can only register SQLite. So to deploy the cloud version, you first log in as an administrator with a local album database and then add Hosting (see the deployment flow in 5.1).
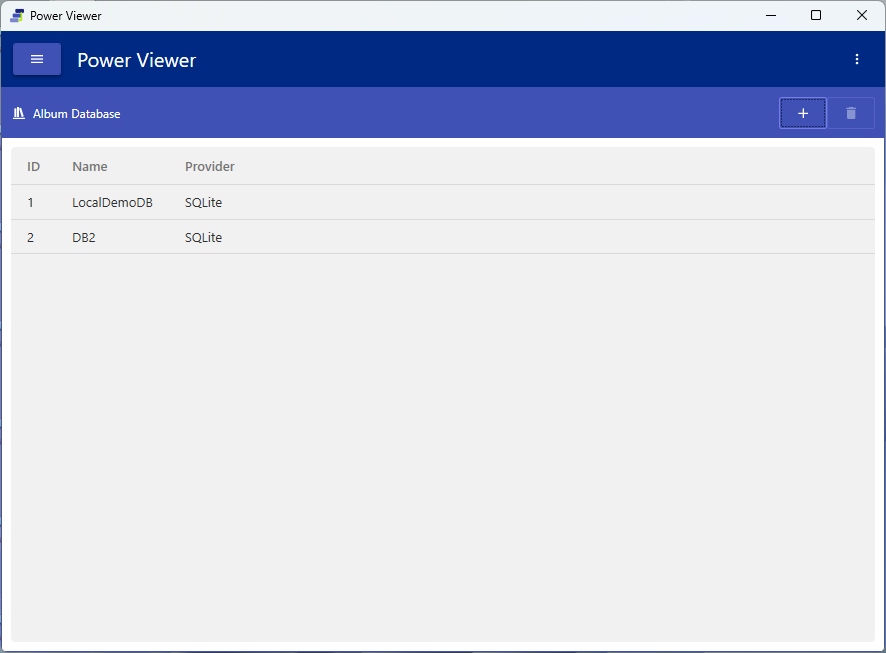
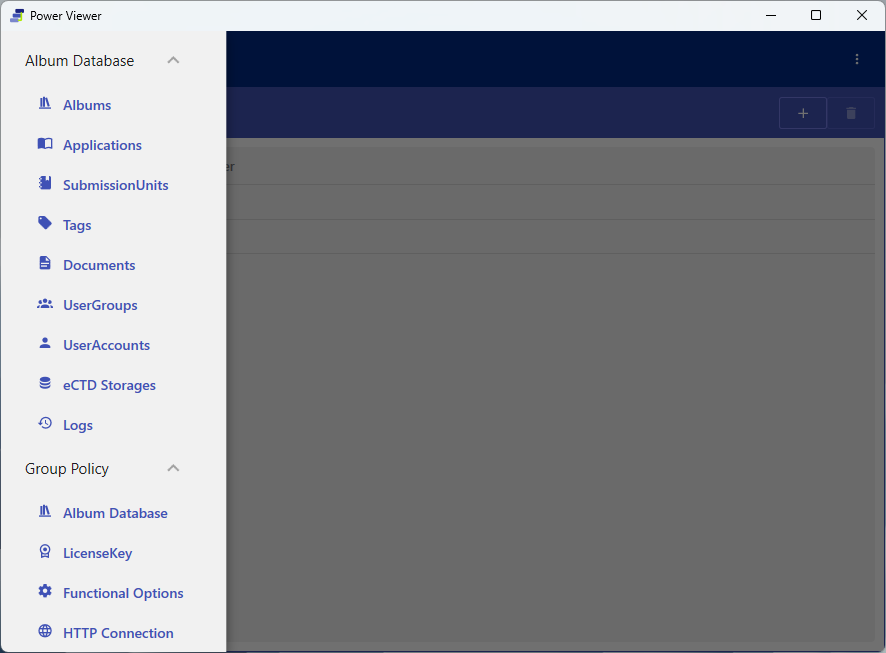
Switch between the group policy screens using the hamburger menu in the upper left.
7.2 Embedding a license key
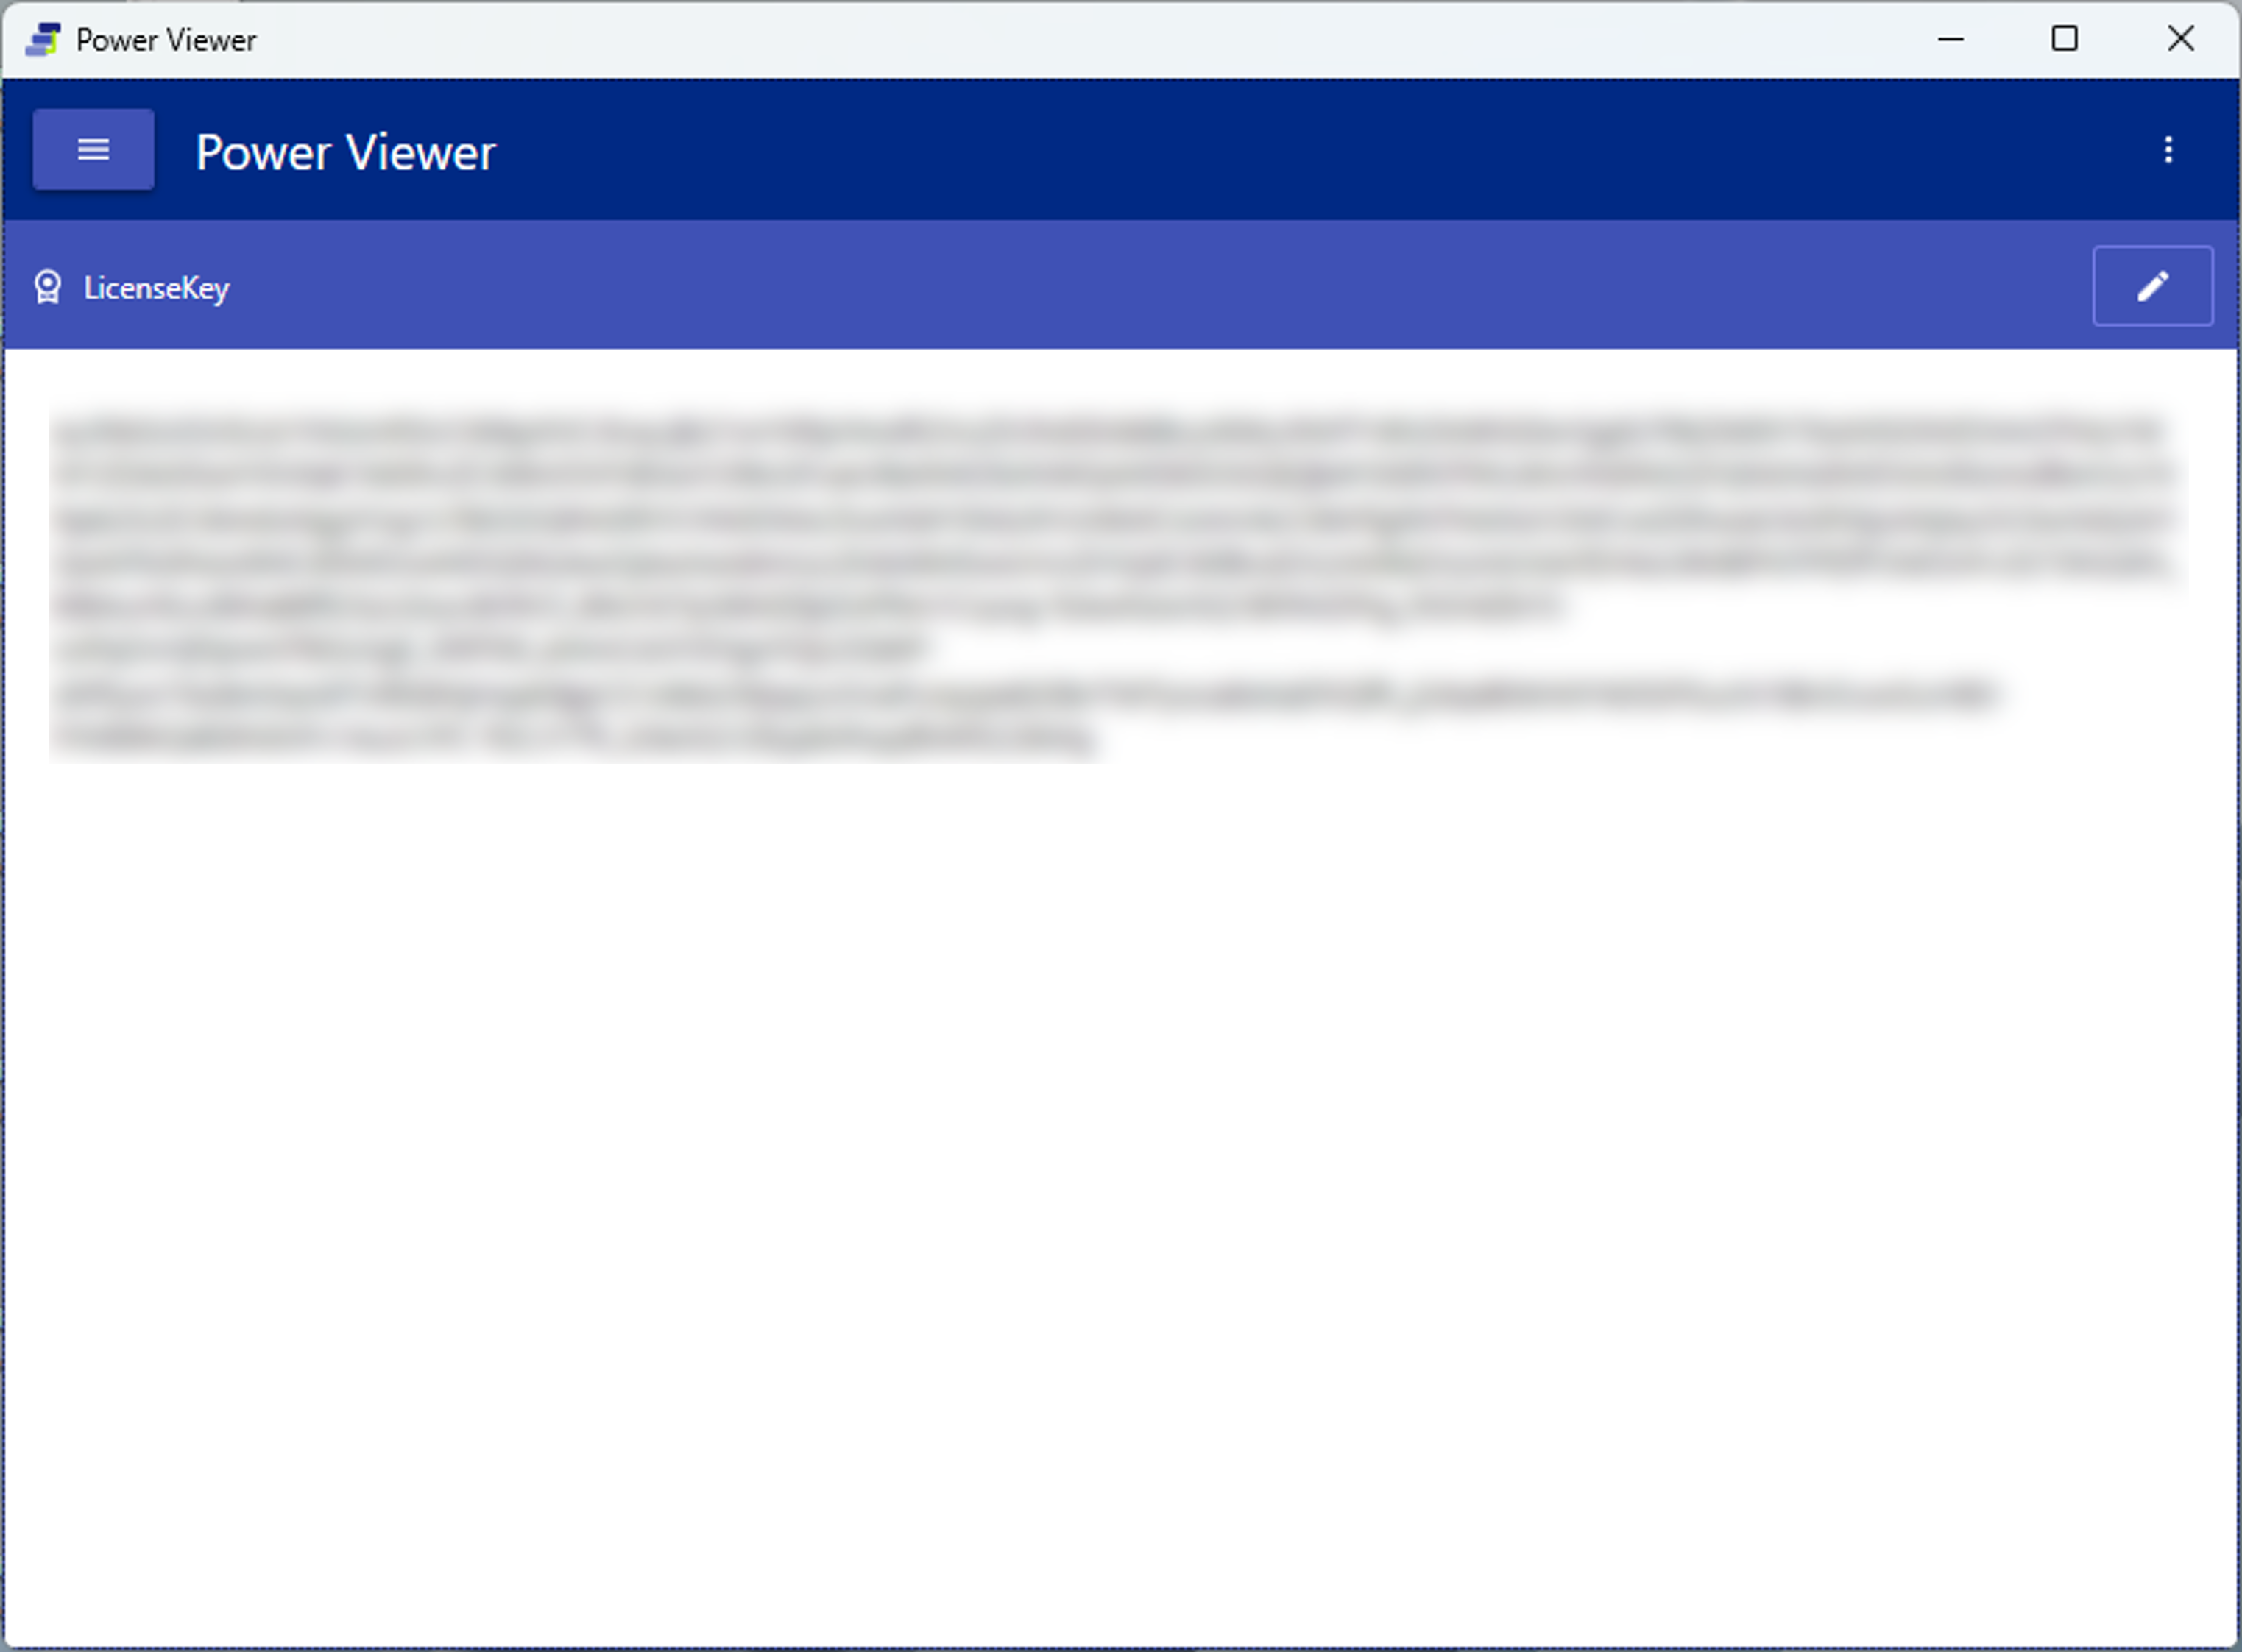
If you save a license key in the group policy, users no longer need to enter a key at login.
7.3 Functional Options
For the entire organization, you can configure whether the following features are allowed or enforced.
| Option | Content | Default (when unset) |
|---|---|---|
| Open PDF in Default App | Whether opening PDFs in the default app is allowed | All users allowed |
| PDF Text Selection | Whether selecting and copying text in PDFs is allowed | All users allowed |
| Error Report | Whether error reports may be sent | All users allowed |
| Refresh Token Save | Whether cloud authentication information (Refresh Tokens) may be saved | Save |
| Login Mode | Login mode (online / offline) | Offline |
| ServerCV Download | The source of the applied CVs (server sync / local) | Local |
| CV List Tab | Show/hide the CV List tab | Shown |
| PDF Viewer Type Override | Fixing the PDF Viewer Type to use | Not fixed |
| User Root Override | Fixing the User Root Path | Not fixed |
| eCTD HTML Export | Whether HTML export of eCTD v4.0 / v3.2.2 is allowed (3.8) | All users |
| Grid CSV Export | Whether saving an on-screen grid as CSV is allowed | All users |
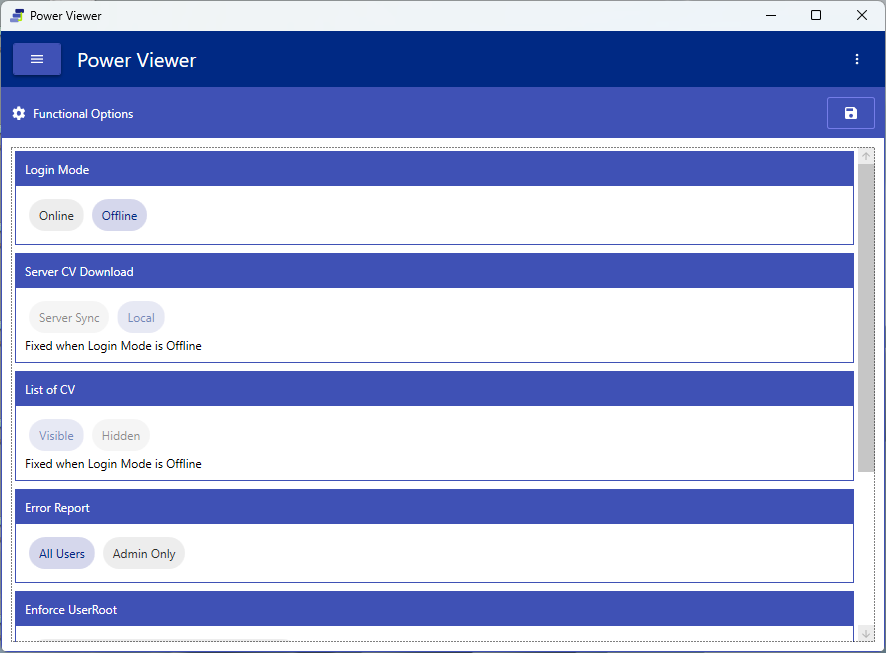
Changes to functional options take effect after the application is restarted. When the PDF Viewer Type / User Root is fixed, the corresponding items are no longer displayed in the user’s Settings (4.2).
Only eCTD HTML Export and Grid CSV Export take effect without a restart or re-login. In addition, existing group policy files (
.pvaf) that do not record these settings are treated as using the default value (all users), so there is no need to regenerate the file (5.4). When restricted, the corresponding action is shown as disabled with the reason.
7.4 HTTP connection settings
These are connection settings such as the proxy used for login and cloud access in general.
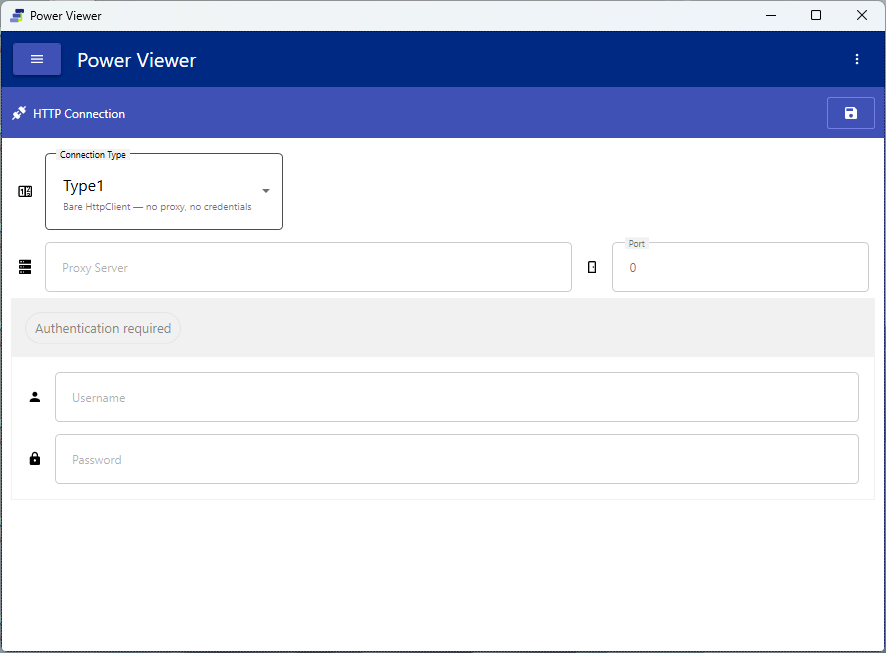
⚠ Incorrect settings may prevent everyone from logging in. Take great care when changing them, and verify with the connection test (5.2). Settings take effect after the application is restarted.
8. Concepts / Appendix
8.1 Understand access control
Access rights are controlled by Album / Application Access Key / Document Access Key / UserGroup / UserAccount.
flowchart TB
    subgraph USERS["User side"]
        direction LR
        UA["UserAccount"] -->|"can join multiple"| UG["UserGroup"]
        UG -->|"holds"| KEY["🔑 Access Key"]
    end
    subgraph ALBUMS["Album side"]
        direction LR
        KH["🔒 Key Hole"] --- AL["Album"]
        AL --- DOC["Application / Document"]
    end
    KEY -->|"viewable when matched"| KH
- Role: Administrator (can do everything) / GroupPolicyEditor (a Viewer who can edit group policy) / Viewer (no editing rights) / Guest (provisional registration at first login). An Administrator changes Guest to a formal role. Roles can be changed by an Administrator (but you cannot change your own role).
- A UserAccount can join multiple UserGroups (viewable in MyAccount).
- A UserGroup holds Access Keys: Members are treated as holding the same keys, and lose them when they leave.
- The key and key hole metaphor: What a UserGroup holds is the Key, and what an Album has is the Key Hole.
- Application Access Key: Makes all Applications in the corresponding Album viewable (type is View only, one per Album, auto-generated). It can carry a Priority-based scope restriction: no restriction when unset, and when a user holds multiple keys the widest value applies. Administrators are never restricted (6.4).
- Document Access Key: Has Type / DisplayName / Allow・Deny / setting string. Deny takes precedence (e.g. Full Access ⟨Allow⟩ + Substance denial ⟨Deny⟩ → everything except Substance is viewable). For the list of Types, see 6.4.
- Special UserGroups: All User (all logged-in users including Guests) / All Registered User (all registered users) automatically include members. Giving these groups a key makes an Album public without individual enrollment (these groups cannot be edited or deleted).
8.2 Understand the file structure
Power Viewer itself, the Group Policy File, the Album Database, and the Sequence Folder are connected in a relationship where “each element remembers and references the path of the next.”
flowchart TD
    PV["Power Viewer<br/>(the app itself)"] -->|"remembers the path"| GP["Group Policy File<br/>(company-specific settings, required)"]
    GP -->|"records connections (multiple allowed)"| ADB["Album Database<br/>(center of eCTD management)"]
    ADB -->|"references the path"| SF["Sequence Folder<br/>(actual eCTD files)"]
- Power Viewer: The app itself. It remembers the path to the Group Policy File in its initial setup.
- Group Policy File: Company-specific settings. It can record paths to multiple Album Databases. Required for operation in a local environment (placing it on a shared server is recommended; sync/distribution operation is also possible). It is a password-protected settings file holding the license key, album database connection settings, functional options, and HTTP connection settings.
- Album Database: The center of eCTD management. You can use a local database (SQLite: a database file encrypted with a password) or a cloud database (Hosting: run on servers operated by Power Office, identified by a Tenant ID). The connection type is registered in the group policy (7.1).
- Sequence Folder: The location of the actual eCTD files. You can choose local or cloud storage.
8.3 Glossary
| Term | Description |
|---|---|
| eCTD | The electronic document standard for pharmaceutical marketing authorization applications (electronic Common Technical Document) |
| Sequence Folder | A folder of actual eCTD files containing submissionunit.xml / index.xml |
| SubmissionUnit | A submission unit. It points to an actual eCTD (Sequence Folder); adding one auto-generates an Application |
| Application | An application unit. It bundles one or more SubmissionUnits |
| Album | A logical container that bundles Applications. It has a Key Hole |
| Access Key | A key that represents access rights. Two types: Application Access Key / Document Access Key |
| Helper Window | An auxiliary window that displays a link destination |
| CV | Controlled Vocabulary — the managed terminology used in eCTD v4.0 (4.3) |
| Group Policy File | A file that bundles company-specific settings |
| Hosting | One of the album database connection types. Refers to the cloud album database on servers operated by Power Office (8.2). Distinct from “Hosted”, the OAuth model of an eCTD Storage |
| Hosted | One of the connection models of an eCTD Storage (where data is stored). The model that uses a Power Office–provided OAuth client (6.6). Distinct from the album database’s “Hosting” |
| Tenant ID | The ID that identifies the contract unit of a cloud album database (Hosting). Issued by us. Distinct from the Entra ID tenant used for eCTD Storage authentication |
| Announcements | The feature for checking announcements from us inside the app (4.4) |
| Activity Log | The audit log that automatically records operations on the album database (6.7) |
| HTML export | The feature that writes an eCTD submission out as a self-contained set of static HTML files for browser viewing. Supports both v4.0 and v3.2.2 (3.8) |
8.4 Supported standards and regulatory authorities
Power Viewer supports eCTD v3.2.2 and v4.0, and multiple regulatory authorities including PMDA (JP), FDA (US), and EMA (EU). For per-authority support status and automatic identification details, see Supported versions and regions.
8.5 Troubleshooting / FAQ
Cannot log in
Check the following, in order.
- Group policy file path: Does the file exist at the path specified on the initial setup screen, and is it accessible (including network reachability for shared servers)?
- HTTP connection settings: In proxy environments, are the settings in 7.4 correct? You can verify with the connection test (5.2)
- License key: Has the key expired? (See below)
- Authentication method match: Does the license key’s authentication method (Entra / AD / Cred) match how you are logging in?
- Role: If you can log in but cannot operate, you may still be a Guest without granted permissions. Ask an Administrator to change your role (6.5)
Cannot log in to the cloud version (Hosting) / 403 or authentication error
- Tenant ID: Check that the Tenant ID registered in the group policy matches the value we provided (7.1). The app cannot detect a wrong value; it surfaces as an error from the server.
- Account registration: With the cloud version, you authenticate with a user account that is pre-registered on the server. If your account is not registered, you get an authentication error (Unauthorized) (5.1).
- Correspondence with the company key: The correspondence between the company key (companyKey) and the Tenant ID is validated on the server side. Contact our support with the server-side message shown.
The license key is reported as invalid
- Expired: The key needs to be reissued
- Product / signature mismatch: Check that the key string is not corrupted (e.g. characters lost while copying)
- Generation mismatch: If the key’s generation is incompatible with the album database’s generation, you cannot connect. Updating the application or reissuing the key resolves this (5.6)
The group policy cannot be loaded
- Check that the file path is reachable
- Older versions of Power Viewer may be unable to read group policy files in the newer format. Update the application to the latest version
- If the file is corrupted, have an administrator regenerate it (5.4)
Cannot open an eCTD / files are not displayed
- Check the Sequence Folder path, the User Root Path (4.2), and the cloud storage authentication status
Some documents are not visible / cannot be downloaded
- Not visible: Check the Document Access Key Deny settings and the Application Access Key Priority restriction (8.1)
- Cannot download: Downloading requires a Document Access Key of the Download type (6.4)
Export HTML is disabled
Check the following in order (when the button is disabled, the reason is shown in its tooltip).
- Usage mode: It is not available in the free usage mode (no license key) (3.8)
- Group policy: eCTD HTML Export may be set to administrators only (7.3)
- Download permission: A Download type Document Access Key is required for the Application you are viewing (6.4)
The exported HTML says “This export is incomplete.”
This means some documents could not be included because of access restrictions, download restrictions, or retrieval failures. Those documents remain in the tree without a link, with the reason shown next to them. Do not treat this folder as a complete copy of the submission (3.8). If you need everything included, ask an Administrator to confirm that the required access rights are granted (6.4).
A tab is not displayed
- CV List tab: It may be set to hidden in the group policy (7.3)
- Datasets tab: It is shown only for eCTD v4.0 with the JP (PMDA) specification (3.5)
- Application / Submission / Styled tabs: The tab structure differs by eCTD version (3.7)
Cloud storage authentication fails
- Delete the authentication information (Refresh Tokens) in the Integration tab of Settings and re-authenticate (4.2)
- For OAuth client configuration (on the vendor’s admin console side), see the eCTD Storages guide
The display language did not change
- Language changes take effect after restarting the application (4.2)
CSV bulk import results in Failed / Duplicate
- Check that the header row matches the expected format (6.2)
- A single import is limited to 100 rows
- Duplicate means the row conflicts with an already-registered SubmissionUnit. Remove those rows and run the import again
Where can I find error information
- Error information is saved as daily log files under
%LocalAppData%\Power_Office\Power_Viewer\{app version}\logs\. When contacting support, please attach the log file for the relevant day
Announcement read status is not carried over to another PC
- By design, the read status of announcements is stored locally per PC (4.4). On a different PC, the same announcements appear as unread again.
For other frequently asked questions, see the FAQ page.